Tag

Audio, Video & Electronics

Browsing

Community Member Credit: DAlastDON

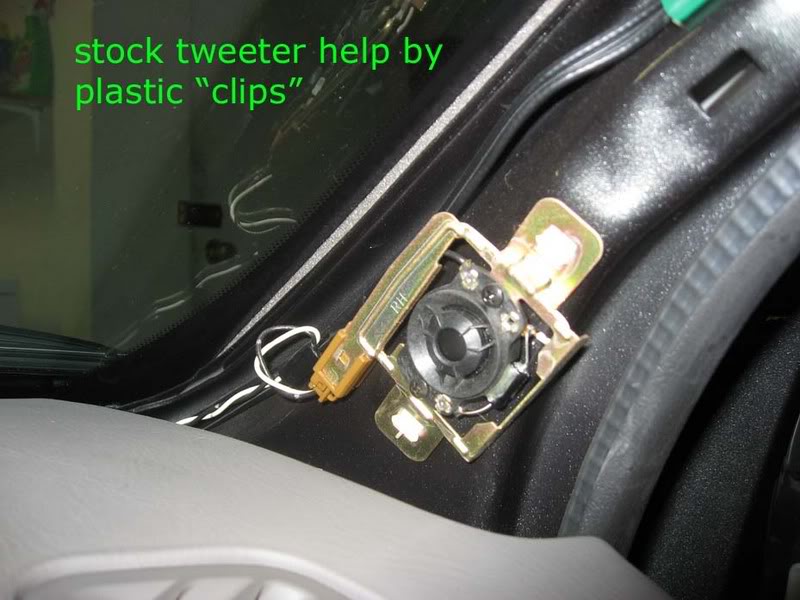
When I bought my 07 maxima one of the things that sold me on the car was the intelligent key fob. Its nice to not have to dig in my pocket to get my keys out. Just walk up push the button on the door handle and im in. After talking to alot of alarm installers and a couple nissan dealerships they all told me that if an aftermarket alarm was installed i would lose the convience of the intelliegent key on the door locks. Also asked if it was possiable to add shock and tilt sensors to the factory alarm and was told that it could not be done.

This led me to google and i saw in alot of bmw, scion, toyota, etc.. forums of people adding sensors onto existing factory alarm triggers in the doors, hood, trunk pins. So i ordered three things, a DEI 507M(tilt sensor), DEI 504D(shock sensor) and DEI 528T(timer). Other items purchased from a local automotive store were, simple on/off switch, standard automotive relay, wire, and materials required to splice the wires together.

The relay is used to shut down the sensors when the key is turned on to avoid the info screen displaying that the trunk is open while driveing. The timer is used to temporaialy disable the sensors while exiting the car. Without the timer you would not be able to immedialy lock the doors and put the factory alarm in “pre-arm” due to the shock sensor sending a gound pulse to the trunk switch. It would cancle the “pre-arm” because it would sense the trunk was open and the alarm would never fully arm. If you wanted to wait about 10 seconds after the last door was shut everytime then the timer woudlnt be required.

Only four connections to the car are needed. One for constant 12v, Accesory 12v, ground, and the trunk switch.

First thing i did was draw a schematic of all the connections.

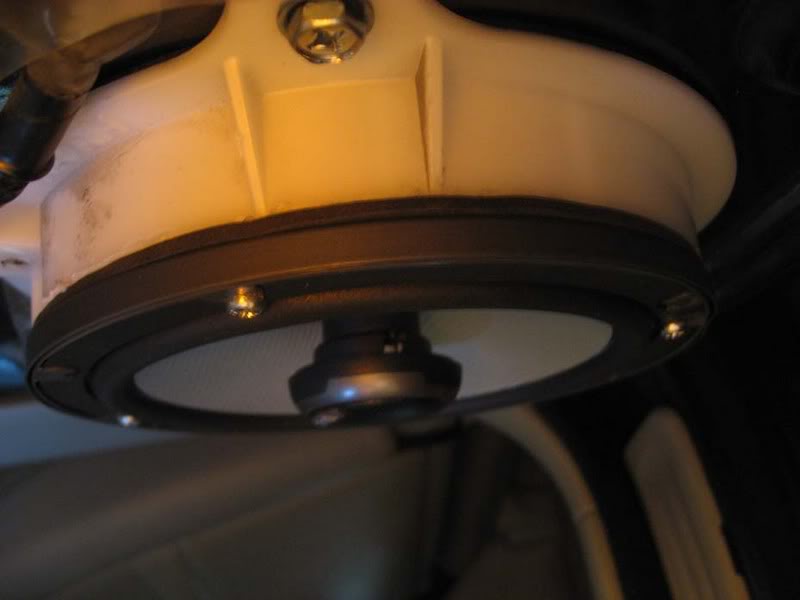
Next using a multimeter i found connections in the fuse box for 12v constant and 12v accessory. I used the fuel lid for 12v constant and cig lighter for 12v accessory. Then found a good ground next to the fuse panel. After finding the power connections the negative side of the battery is disconnected.

Next I decided where i wanted the sensors and timer/relay located. The sensors are located underneath the center console glued down using crazy glue gel and the timer/relay are located behind climate controls.

A simple push button switch was put inside center console storage space just in case it storms real bad and the wind/rain keep triggering the alarm.

Makeing the connection from trunk switch can be made from one of two places. Either at the BCM(pin#42) behind the fuse box or right at the trunk latch. Its a very small wire and i didnt have a small enough splice block to pierce the insulation at the BCM so i routed a wire from the switch i installed in the arm rest storage to the trunk latch. The wire is violet with a white stripe. I striped back enough wire to to stick into the connector then plug the connector back in. Make sure your wire will make contact inside the connector or nothing will work.

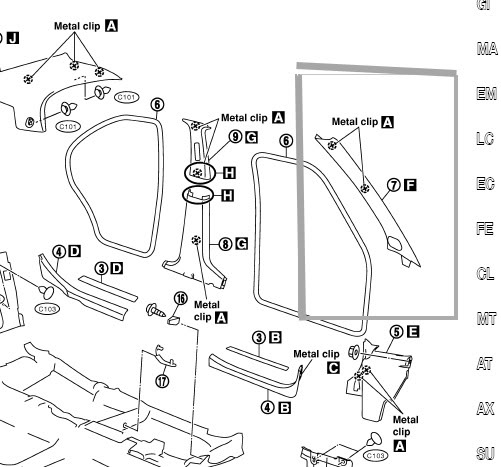
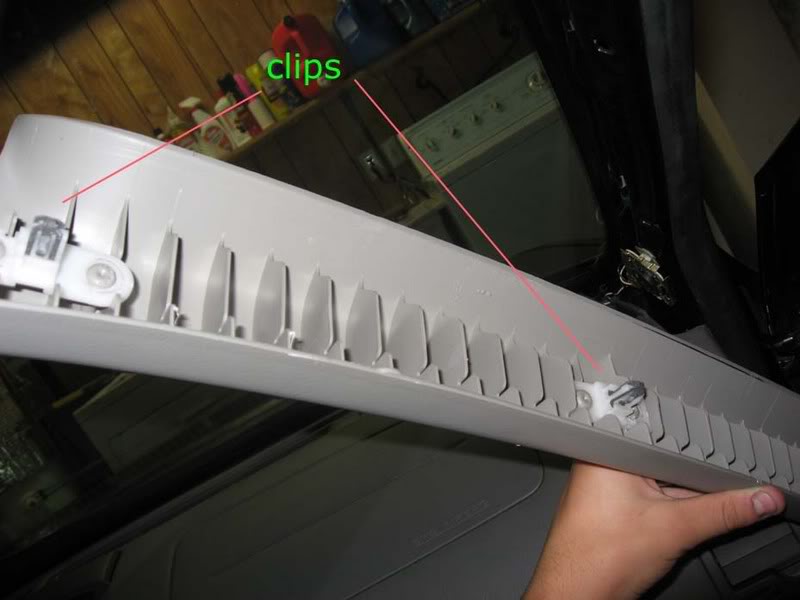
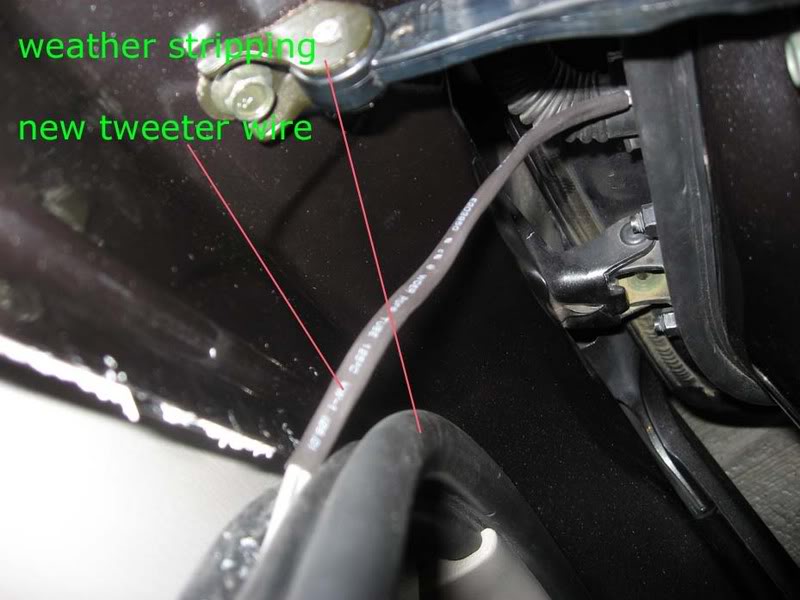
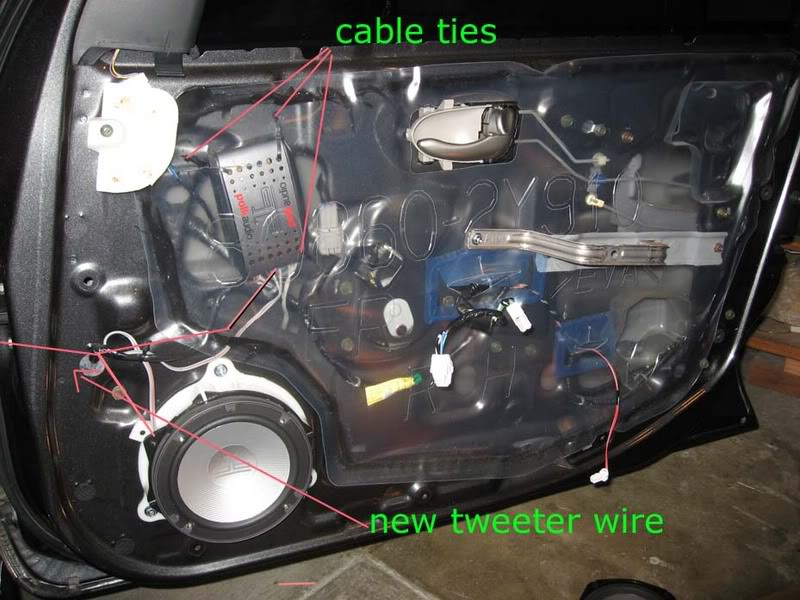
Routing the trigger wire from the switch in the armrest to the trunk is easy but going from the trunk to the trunk lid through the rubber hose and through the inside of the trunk lid is difficult. I pushed a stiff piece of wire inch by inch through the rubber hose. Put tape around the end of the wire so it doesnt poke through the hose as you push and carefully bend and guide it around the curve of the hose. Once through tape your wire comeing from the switch in the armrest to the wire you stuck through the rubber hose then carefully pull it back through. It will get stuck on the other wires several times. Just be patient. To get the trigger wire though the inside of the trunk lid it is even more difficult. I used a long piece of stiff wire and fished it from the latch to the rubber hose. It will take several attempts to get the wire though. Once through just tape the trigger wire on and pull it right through. It may have been easier if dynamat wasnt installed previously not only on the trunk side but also between the inner and outer skin of the trunk lid. Not pictured are all the cuts and scratches on my right hand.

The relay used is just a generic 5 pin relay found at any automotive parts store. I pulled my dash apart to see if it had a brand or part number on it and it had nothing. To the best of my knowledge any 5 pin relay with a normally open and normally closed contact will work. I got mine from autozone. I just told the guy at the counter that i needed a 5 pin relay. On the bottom of the relay the pins are numbered. Make sure the one you get has and “87” and “87a”. The letter after the “87” can be anything. On mine its “87q”.

I have zero problems. The intelikey works exactly as it did before.

The trigger outputs are connected to the trunk pin(switch). A picture is worth a 1000 words. Cant make this any clearer.

Be sure to turn the sensitivity all the way up on the shock sensor via the screw adjustment on the sensor. When i roughed the install in to test it and had everything just laying in the back floor board just a little peck on the window would activate the shock sensor. But after putting it under the center console i had to turn it all the way up and it takes a good thud on the window. The preset sensitivity of the tilt sensor is perfect, it triggers after the car has been jacked up a few inches at all four tires. We have had a couple of good thunderstorms with 50mph winds with no false alarms yet.

Picked this up at autozone where the fuses are. It allows you to tap into one fuse socket and fuse two items separately. Im going to add another to the fuel lid connection soon so i can fuse it separately as well. Didn’t feel like making another trip to autozone to pick up another at the time. Make sure its for the mini fuse and not the full size.

Loading

Member Credit: 415Max96

So I installed Polk DB6500’s and DB650’s (rear) today, managed to snap a few pics:

INSTALLING REARS

1. Start by taking off the doors.


2. Rear bose speaker is a 5.25 attached to a protective plastic piece. unscrew speaker and disconnect

— you will have this left, now remove the white piece, its held by three screws

3. The new 6.5″ polk met some resitance from white piece, the trim on top did not alow the speaker to fully submerge so a trimming had to be made


—————->

4. Attach the new speaker, if it comes with the foam padding, place it between speaker and the white piece

5. Easy as cake, make sure evrything works and remember to put all plugs back in their respective places, put door back on and your ready to get crackin with the fronts 

THE FRONTS

1. Refer to step 1 in rear doors and remove front door panel.
2. Remove the A-Pillar, its help by to clips

Here we see the pathetic stock tweeter…i had to put on my grandmothers glasses to see that it was a tweeter and not a glued on dime

Comparrison of OLD and NEW Polks

and the Tweeters

NOTE; be carefull not to damage the tweeter in removing the grill, i got into a liitle rush and ended up poking the tweeter, thank godness no performance damage

3. Installing new tweeters; since their is no way to use the stock mount for the new tweeter i had to improvise with some industrial velcro. Yes, its ghetto; how well it will hold up i will have to wait and see. After install i took it out for a drive and did not notice any rattles coming from either side.

The cable I ran the new cable throught the weather stripping. peel it back, insert new wire, put it back.

I tried to see if i could run the wire through the rubber protector that runs all the stock wire from cabin to door, however i found that their is not 1 cm of space for the new wire. I ended up using rubber heat shrink to cover the exposed wire between the weather stripping and the part were it enters the door

4. You CAN however, feed the tweeter wire through the door side of the rubber protector and fish it out of the other side
NOTE: carefull not to allow the wire to interfere with teh operartion of the window rail.

I forgot to take some pics but you can get the idea of were the wire should run to. Also note the location of the Crossover. It is securely ziptied and did nt seem to make any noise during install or during the test drive, hopefully it will hold up and wont need to be relocated. Their were no fitment problems during re-installation of the door panel

5. Here is another view of were the new wires go through.

6. Woofer install

The stock fronts seem to be 6.75″ because i had to use the brackets supplied from crutchfield. Attaching brackets to the white bezel is straight froward. I used the foam spacer between the bracket and the speaker

7. Again make sure everything works before re- instaling everything.

Additional Notes;

I. The stock signal goinng to the woofers was used for the cross-over.
II. Time to complete both front and rears was about 5 hours, includes taking pictures and figuring out best way to run all the wires. I had the most trouble finding a way to route the new tweeter wire. After figuring out one side, the other one was a piece of cake.

Loading

Member Credit: Candelario Amaya Jr

This my review on Xrross Android stereo. Installed into my 2014 Maxima without Bose or color screen. Had to use Axxess ASWC-1 for steering wheel controls and ASWC-1 programmed to Pioneer/Jensen. It is a great unit, the one installed is the higher end as of now.

I have been using it for a few days and updated it. Yes, it can be updated. I suggest a 4G dongle or talk to your carrier for a device to add WiFi to your car to get full effect of this. The unit in video also has two sets of AV RCA jacks. Also have headrest monitors connected to unit. Sorry for not showing that.

Model #: X7502A6-S
Price: $249.00

Additional Photos:


Loading

Member Credit: Jack Sulaiman & Geraldo Martin

Price: $699.99

Order Link: https://www.phoenixautomotiveinc.com/collections/nissan/products/10-4-tesla-style-vertical-screen-android-navigation-radio-for-nissan-maxima-2016-2017?fbclid=IwAR2cfcsGyrmZcT7Vb07aN2GquU-Vwo361FlDN09ZZZmF6TEgAdboLjz88Fc

Other Notes:

  •  Plug and play
  • Recommend you get the 2GB Ram version.
  • Took about 2 weeks. Came from Hong Kong via DHL
  • IDO NOT disconnect the airbag indicator light on the factory stereo. All you have to do is unclip it from the factory stereo and leave it in the console behind the new stereo.

Other Reported Issued by Jack:

  • 1. The clock in the gauge cluster does not sync automatically so all you have to do to remedy that is disconnect the battery leads and reconnect at midnight lol
  • The screen does not display the correct thermostat temp even though the AC and all HVAC controls work flawlessly. (I am in contact Phoenix Android radios and waiting to see how they will fix this, (most likely be a software update/patch)
  • Controls all work, only issue is the temps are wrong on the display. The range showing is 89f up to 93f with increments of one. But on 89f it is like 60f. This will be resolved with an update
  • Bluetooth call audio on the receivers end (the person you’re talking to) isn’t that great probably because of the microphone placement. There might be something in the settings to change but I haven’t fooled around with it much.
  • Other than that, this thing is a million times better than the factory stereo. Also sound quality is way better because now you have a multiband EQ
  • I’ve never installed a car stereo before and I took me about 3 hrs in total
  • It came preloaded with google maps. This is based on android. The the possibilities are endless. You can download other nav apps if you like with offline maps instead of having to use an internet connection. I hooked up the gps antenna right behind the head unit and it works really good
  • I don’t have bose, but it seems that it is compatible with bose. There are two different Maxima settings for the unit. So I would assume it is compatible. It would be best to ask them .


Loading

Member Credit: EddyMaxx

So earlier today, I went for a quick cruise in my 98′ 4thgen. I made a quick stop by a Dunkin Donuts and aired down the car as I have air suspension. I walked  back and got inside my car. Then as soon as I hit the Accuair remote to go up nothing happened!!!! UGHHHHHHHHHHHHHHH. The car is not driveable when it’s fully aired out.

But the good news!! It was a loose wire that was not making a good solid connection. It was the orange wire that goes into your Accuair ECU. It’s connects to a switched 12V source. Below is a photo of the orange wire that I’m referring to. Follow the wire and confirm that is properly secured and joined with a 12V source. This resolved the issue for me! Hope this helps someone!

Remote Behavior

And there she is!


Loading

Gallery of 5thgen Maxima Double Din Radio & Tablet setups.

Loading

Gallery of 6thgen Maxima Double Din Radio & Tablet setups.

Loading

Gallery of 7thgen Maxima Double Din Radio & Tablet setups.

Loading

If you’ve recently installed a radio, seats or any other sensitive electronics you may have triggered you’re air bag light. It typically just flashing on and off once it is trigger. But no worries. The procedure below will help you reset. We’ve tried this procedure various times and works perfect.  No fancy tools need. Just about 5 minutes of your time.

There are many other variations out there on the web, but this is the one we found to work best on the 09-15 7thgen Maximas.

1. Turn the ingtion on (don’t start the car)
2. Wait for the airbag light to turn off (about 5 seconds) and turn the ignition off
3. Wait for 1 second and turn the ingtion on (don’t start the car)
4. Wait for the airbag light to turn off (about 5 seconds) and turn the ignition off
5. Wait for 1 second and turn the ingtion on (don’t start the car)
6. Wait for the airbag light to turn off (about 5 seconds) and turn the ignition off
7. Wait for 1 second and turn the ingtion on (don’t start the car)
8. Wait for the airbag light to turn off (about 5 seconds) and turn the ignition off
9. Start the vehicle and the light should be off.

Loading