Category

my4thgen 95-99

Category

Member Credit: Eddy

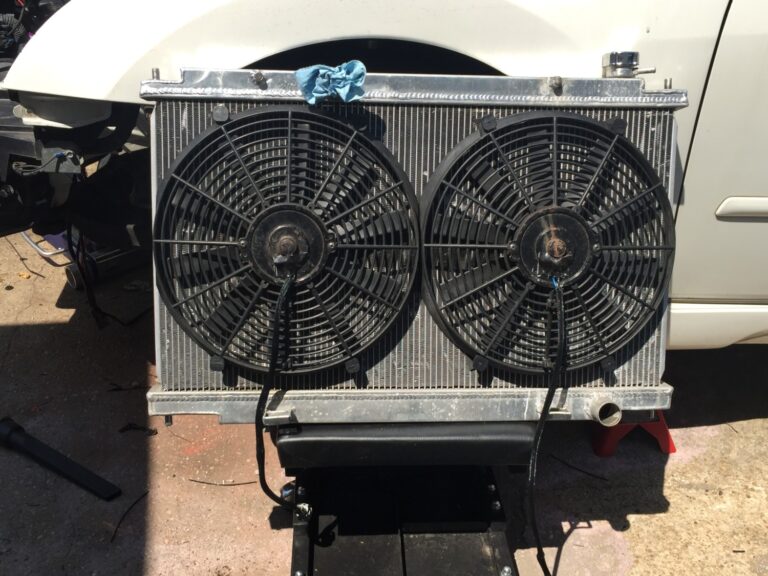
I decided to change my stock OEM Nissan fans to Mishimoto Slim fans. Below is what I did in order to make the fans plug-n-play, to the stock harness. For Mishimoto, you don’t really need a relay but it doesn’t hurt to have one. If you decide to do stronger fans like SPAL, you will definitely need a relay to avoid melting your wires. Those are very very strong fans of which the stock plugs cannot handle without a relay.

Important Note: Wire colors may be different so please check the factory service manual. You can use the below as a reference.

Instructions:

  1. Get a set of 1995-1999 4thgen Nissan Maxima Radiator Fan harness pigtails. You need the female end to make your Mishimoto fan plug-n-play. On the 04+ Maximas, the female connector is on the fan itself and cannot be reused.
  2. Positive Wires (12+ v): Twist pigtail wire 1 & 2 (Green and Blue) together to the blue wire on the Mishimoto fan.
  3. Ground Wires (-): Twist wires 3 & 4  (Yellow and Black) together to the black wire on the Mishimoto fan.
  4. Test your fan by unplugging the temperature sensor and turning the key to the ON position. Fan should automatically come on. Confirm the fans are also turning in the same direction of OEM fans. Turn off car.
  5. If steps 1-4 are good, solder/heat-shrink wires and repeated for your second fan.

All Set.

Reference Photos

Loading

Member Credit: Nathan Davis

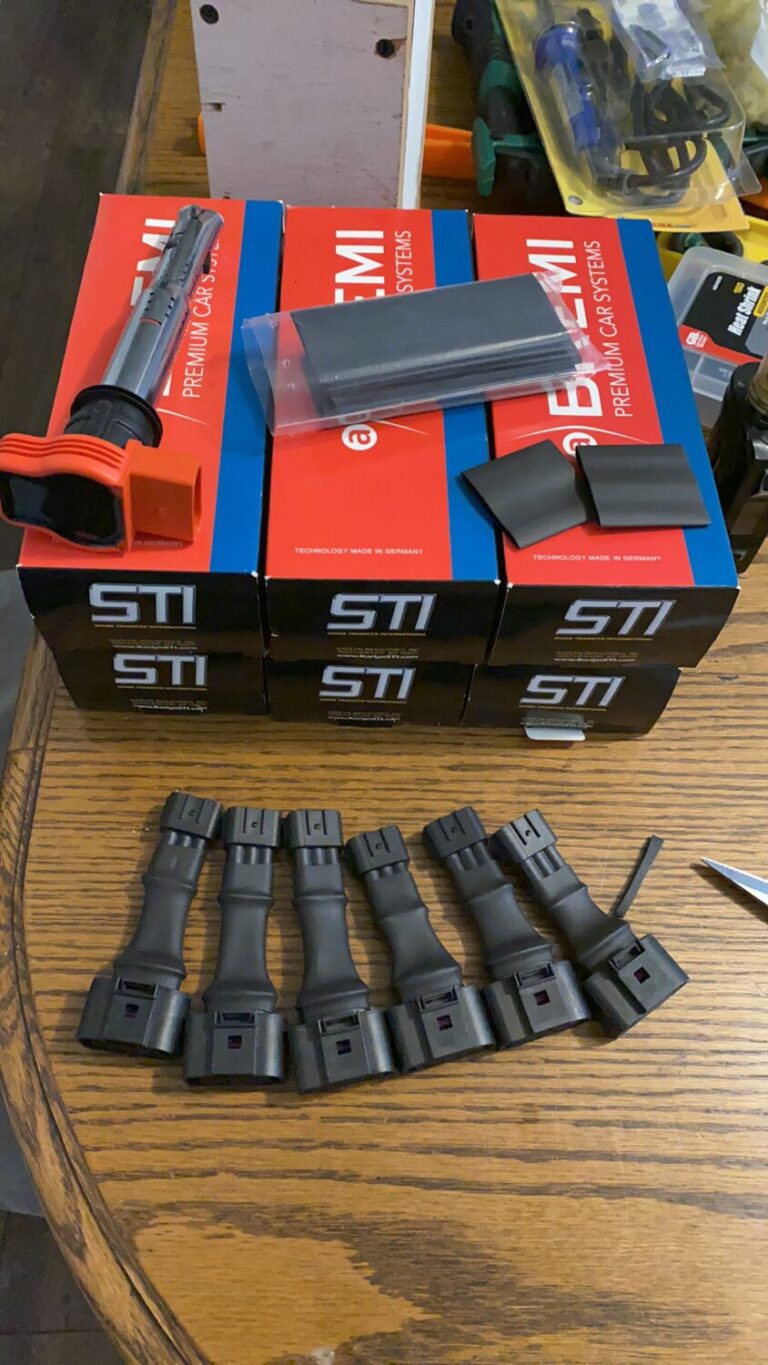
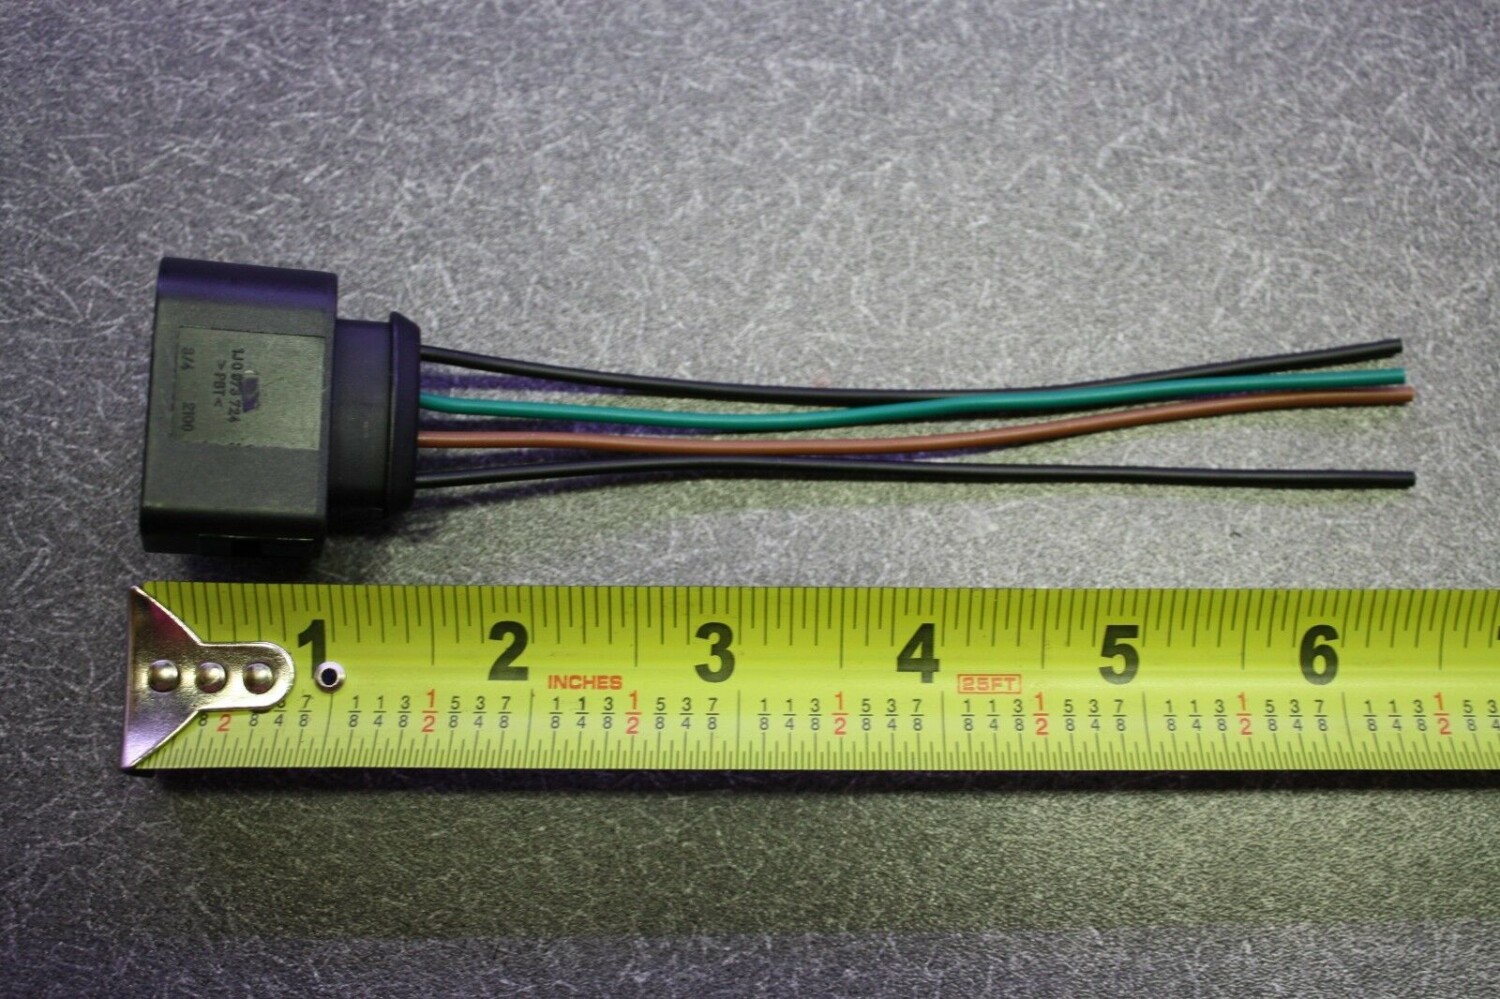
This write-up will help you make your own Audi R8 Coil Pack connectors. This version is very nice and clean. You can also hit up Nathan Davis on Facebook if you would like for him to make you a set.

Important Note: On the VQ35DE (2002-2008), you will need to use NWP Spacers for the Coil Packs to sit properly. The Gen2 VQ35DE (2009+) do not require spacers. You will also need the adapters to plug them in or make your own by splicing directly.

Audi R8 Coil Pack Connector 

Nissan Coil Pack Connector

Additional Items: 

  • 1” by 4” Heat Shrink
  • Terminal Crimpers
  • Heat Gun
  • Wire Strippers

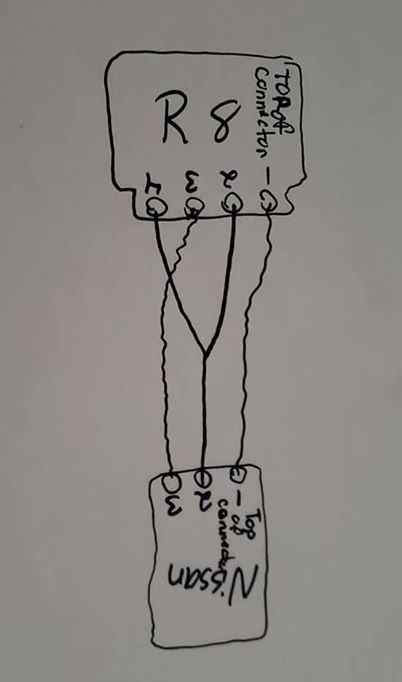
Wiring Diagram

Connector Soldering 

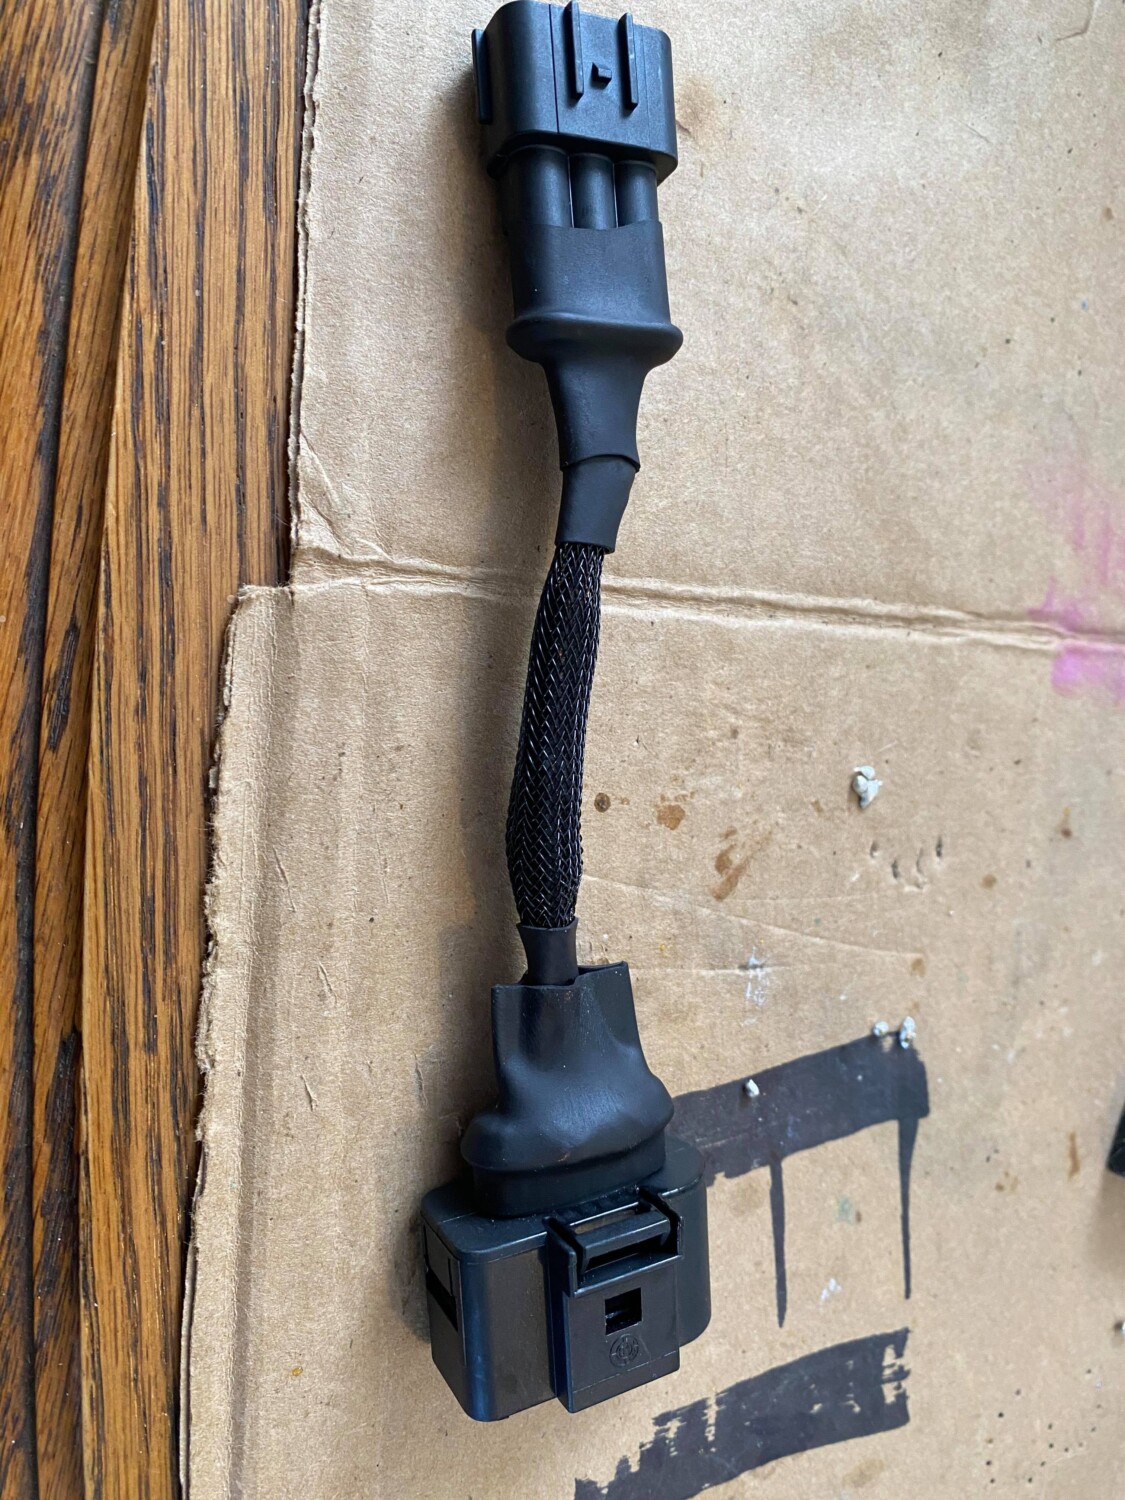
Final Product

Installation Photos

Audi R8 Coil Pack Advantages:

  • 50,000 volts compared to Nissans/Infiniti 30,000 volts.
    • Some measure it with Kv so Nissans coils put out 21Kv while VW coils put out 30Kv
  • Quicker Heat dissipation. (Because of its metal body construction it can quickly dissipate heat. Nissan OEM body is made out of rubber that isolates heat instead of disperses it.)
  • More complete burn of the fuel mixture compared to OEM Nissan which equals to better MPG.
  • Idle Stability Improved
  • NO CEL (Check Engine Lights)
  • BEST PART ABOUT THEM IS THEY ARE CHEAPER $$$ than Nissan OEM yet they are much better.
  • Looks 10000% Cooler than OEM Coilpacks

Now the coil packs price varies due to different name brands. They range from $132-$216 for a V6 engine. Below is the link of the coil packs below so you can see the prices and brands. Doesn’t matter which brand you use. They all make the same exact power.

Order Link: https://www.nedautoparts.com/search?q=Audi+coilpack

Loading

Please Note: This is in reference to the 6-Speed Manual Maxima’s.

What does HLSD Stand for?

HSLD Stand for Helical Limited Slip Differential

What is it and what does it do?

It is a limited-slip allowing power to be fed to both wheels when wheel slippage is felt. You can feel it kick in when you burn out….you ever notice how cars tend to turn to one side…well on yours…you should just pull straight.

How do you know if you have a factory 6-Speed HSLD?

The identification for the engine and transmission is located under the hood on the firewall in the form of a thin aluminum plate. The engine code will read: VQ35(DE)

If you have a 6 speed with an open diff the code will be: RS6F51A

The last letter A means open diff. Open diff is just the regular factory transmission without HSLD.

If you have a 6 speed with a Helical Limited-slip Differential the code will be: RS6F51H

The last letter H means Helical.

Important Note: The 6-Speed Manual Axles are the same for either open diff or HLSD. The automatics are the ones that are different.

HLSD

Additional Reference Photos:

Loading

Member Credit: Ronny Para

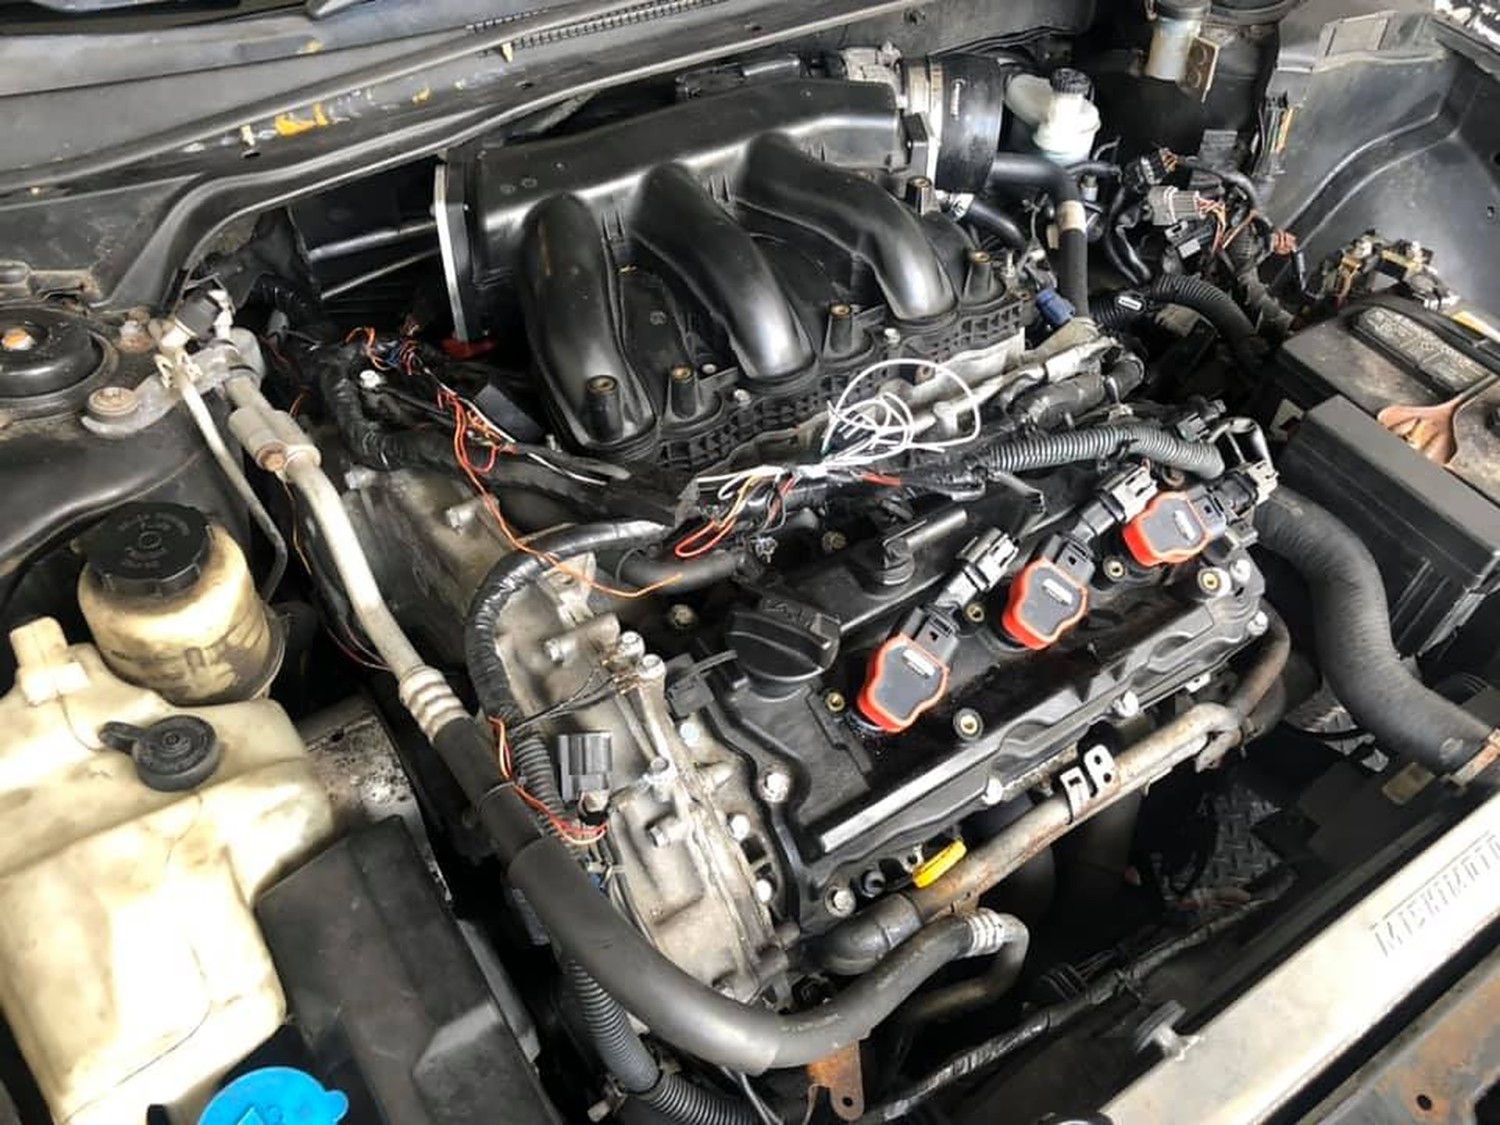
This article will help you install Audi R8 Coil Packs on your VQ30DE. For those that don’t know, Audi coilpacks are stronger and better than Nissan coilpacks. They add better mpg and more HP/TQ. It works on bone stock vehicles or highly modified vehicles.

Nissan Coilpack only has 1 coil. Audi has 2 coils as you can see in the picture below. By having 2 coils it doubles the spark output and can easily handle spark blow out that turbocharged vehicles suffer from. Because it’s outer exterior has a metal body it can dissipate heat ALOT quicker than Nissan rubber which helps with heat cycling. It’s also cheaper than OEM Nissan Coilpacks.

More Details info on installation and pricing can be found here: https://www.my4dsc.com/audi-r8-coilpacks-installed-on-vq35de-nissan-engine/

Front Valve Cover

The Audi R8 coil packs fit perfect on the front valve cover and do not require any modification. It will work fine even if you have NWP spacers installed on the front.

Rear Valve Cover

The rear valve cover requires some modification for a flush fit to ensure the R8 plug makes full contact with the spark plug.  Since the coil packs now go further in…. they clear the manifold as well which requires no additional spacers.

Audi R8 Coil Pack Advantages:

  • 50,000 volts compared to Nissans/Infiniti 30,000 volts.
    • Some measure it with Kv so Nissans coils put out 21Kv while VW coils put out 30Kv
  • Quicker Heat dissipation. (Because of its metal body construction it can quickly dissipate heat. Nissan OEM body is made out of rubber that isolates heat instead of disperses it.)
  • More complete burn of the fuel mixture compared to OEM Nissan which equals to better MPG.
  • Idle Stability Improved
  • NO CEL (Check Engine Lights)
  • BEST PART ABOUT THEM IS THEY ARE CHEAPER $$$ than Nissan OEM yet they are much better.
  • Looks 10000% Cooler than OEM Coilpacks

Now the coil packs price varies due to different name brands. They range from $132-$216 for a V6 engine. Below is the link of the coil packs below so you can see the prices and brands. Doesn’t matter which brand you use, I’ve tested them all and they all make the same exact power.

Order Link: https://www.nedautoparts.com/search?q=Audi+coilpack

Loading

The ACC belts are the same for 1995-2008 Maximas. The idler pulley is also the same PN. The belt can be any brand long as its 36.5 inches long and 6 ribs. It can be a little longer or shorter as the tensioner will take up the slack so between 35.5″-37″. We will include the two most popular choices when doing this modification.

You can buy these at your local parts store like Autozone or Advanced Auto Parts. We’ve included some order links if you would like to order online from a reputable website.

Reasons for doing this:

  • Your AC compressor makes to much noise
  • Your AC compressor is fully seized
  • You live in Alaska or Antarctica and don’t need AC
  • Weight Reduction and you don’t give a shit about the AC Compressor.

Option 1: Belt 365K6 (Most Common)

Length: 36.5″
# of Ribs: 6

Order Link: https://www.vbeltsupply.com/365k6-1.html

Replaces:

  • Dayco – 5060365
  • Gates – K060365
  • Goodyear – 4060365
  • Metric Belt Code – 6PK0927

Option 2: Belt 370K6

Length: 37″
# of Ribs: 6

Order Link: https://www.vbeltsupply.com/370k6-1.html

Replaces:

  • Dayco – 5060370
  • Gates – K060370
  • Goodyear – 4060370
  • Metric Belt Code – 6PK0939
  • Napa – 25060370

Option 3: Belt 360K6

Length: 36″
# of Ribs: 6

Order Link: https://www.vbeltsupply.com/360k6-1.html

Replaces:

  • Dayco – 5060360
  • Gates – K060360
  • Goodyear – 4060360
  • Metric Belt Code – 6PK0914
  • Napa – 25060360

Option 4: Belt 355K6 (If Using Under Drive Pulley)

Length: 35.5″
# of Ribs: 6

Order Link: https://www.vbeltsupply.com/355k6-1.html

Replaces:

  • Dayco – 5060355
  • Gates – K060355
  • Goodyear – 4060355
  • Metric Belt Code – 6PK0901
  • Napa – 25060355

Installation Photos:

Additional Info:

You may find there is a bolt in the way. You can easily remove it. It’s a 14 MM.

Loading

Community Member Credit: vipervadim

95-01 5spd VLSD rebuild (open diff part numbers too)

I’ve rebuilt 8+ or so 5spd open/VLSDs. Converted plenty of 6spds to HLSD/spec-V 6spd swaps. So it’s not a big deal for me to undertake something like this in a week.

I usually work thru and don’t stop to take pictures, so here’s some pics I was able to snap in between working/breaks. This is not a guide by any means, just familiarizes you with what is involved. This is not a job for someone who doesn’t have intermediate/advanced wrenching skills – so you’ve been warned..

it took me a week to disassemble my first 5spd back in 2005, now ~3 hours. If you are not familiar with how a manual transmission works internally, or are not confident in your abilities or can’t deal with issues when issues arise – leave this job for someone who knows it well.

I did not show the disassembly of shift forks/pins/how to set the check ball system/reverse gear/proper way to re-shim new bearings and other complex parts of rebuild, so once again this is NOT a how-to guide in any form or shape – I’m just posting pics of my progress.

BEARINGS SEALS PART NUMBERS

All ordered from Nissan = NACHI/NSK/NTN high quality Japanese bearings.
I’ve seen cheap kits with unknown bearing brands (made in china) and would not recommend using them due to the questionable quality of bearings

  • Input shaft bearing 1 – 32203-03E13
  • Input shaft bearing 2 – 32203-03E00
  • Main shaft bearing 1 – 32273-79E00
  • Main shaft bearing 2 – 32223-79E62
  • Pass side diff bearing (open diff – 2X) – 38440-96E00
  • VLSD driver side diff bearing (EXPENSIVE) – 38440-79E01
  • Input shaft seal – 32113-03E00
  • Shifter yoke seal – 32858-03E00
  • Pass side axle seal – 38342-81X01
  • VLSD driver axle seal – 38342-51E00
  • Open diff driver axle seal – 38342-81X00

How do you know if you have open diff or VLSD (the dumb way – look at the transmission)

  • if axle seal is small = open diff (left)
  • if axle seal is large = VLSD (right)

Name: vlsdcasedifference.jpg Views: 352 Size: 39.3 KB

Now that you know what transmission you have you can get the proper seals/bearings.. not gonna be cheap (VLSD bearings are ~$450)

Name: 20140427_141731.jpg Views: 272 Size: 76.6 KB

Onto the pictures: starting disassembly

Name: 20140421_140757.jpg Views: 247 Size: 123.6 KB

Cover is Off

Name: 20140421_145506.jpg Views: 278 Size: 101.8 KB

Shift forks, main/input shafts and diff is out

Name: 20140421_153026.jpg Views: 246 Size: 122.9 KB

OLD bearings off

Name: 20140427_135727.jpg Views: 297 Size: 93.1 KB

OLD bearing leftovers

Name: 20140427_122252.jpg Views: 229 Size: 98.7 KB

Shift yoke out

Name: 20140427_135744.jpg Views: 241 Size: 102.2 KB

Cases cleaned

Name: 20140427_144633.jpg Views: 223 Size: 107.2 KB

Yoke with new seal and boot in

Name: 20140427_185217.jpg Views: 244 Size: 93.2 KB

New bearings pressed on

Name: 20140427_185152.jpg Views: 261 Size: 75.4 KB

Assembled and sealed (need to swap speed sensor)

Name: 20140504_155235.jpg Views: 226 Size: 98.5 KB

Old tranny out

Name: 20140503_182543.jpg Views: 234 Size: 52.9 KB

VLSD tranny going in

Name: 20140504_164435.jpg Views: 229 Size: 95.6 KB

NEW axles, NEW throw out bearing

Name: 20140504_185203.jpg Views: 253 Size: 91.1 KB

and that’s all.. fun times y0!!

Loading

Community Member Credit: vipervadim

Another Project from 2014

6gen brakes swap into 4th gen Maxima that clear 16in rims

I’ve seen plenty of 6th gen brake swaps into 4th/5th gens but I’ve never seen them modified to clear 16in rims.

I have 16s, spring and stuts, I plow through potholes in NYC, I’m never going to drive low and SLOW and avoid all potholes like some others with huge rims and lowered cars. With that being said, I needed bigger brakes to help me SLOW down better.

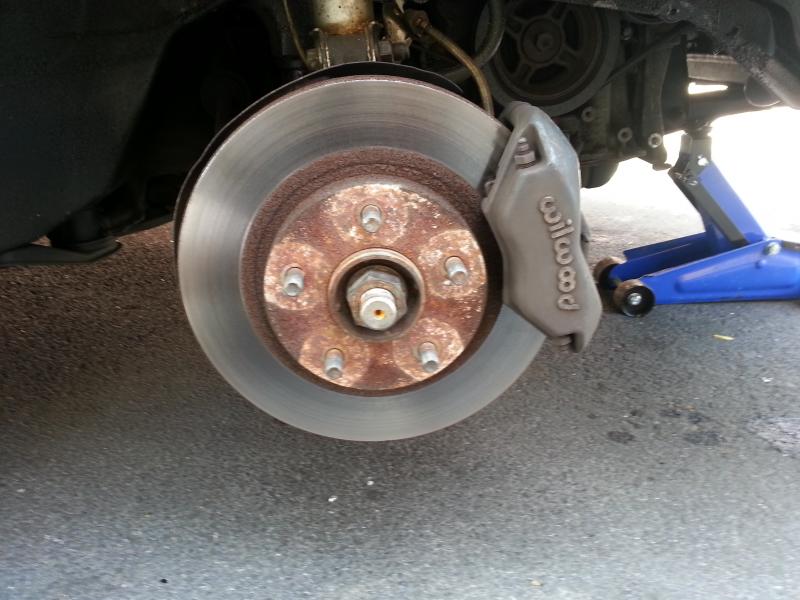
I already had 11″ 2000 Max rotors and 4 piston wilwood dynalite calipers. Good for 60-0mph stops, but doesn’t fare too well with repeated high speed braking (100mph+). So back to the drawing board I went – The result is this thread

Old brake setup: 2000 Maxima(thicker than 95-99) 11″ rotor with Dynalite 4-piston Wilwoods

Name: 20140820_115954.jpg Views: 273 Size: 64.6 KB

they clear 15s with no problem!

Name: 20140817_180101.jpg Views: 221 Size: 52.1 KB

OLD setup vs New (11″ rotor vs 12.6″ rotor)

Name: 20140820_185140.jpg Views: 247 Size: 84.5 KB

Here’s where the fun begins:

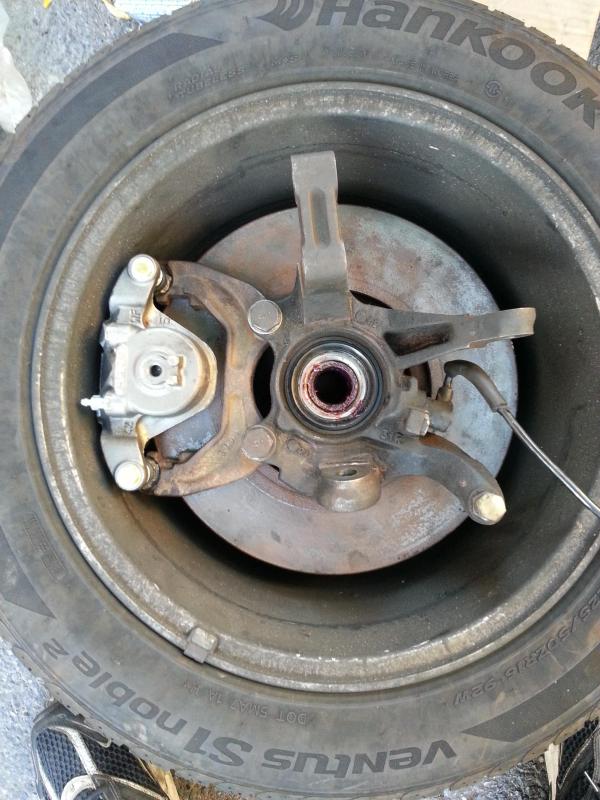
To put 6th gen brakes into a 4th gen you need to enlarge the caliper mounting holes on the spindles.

  • Stock is 12mm
  • Need to enlarge holes to 14mm

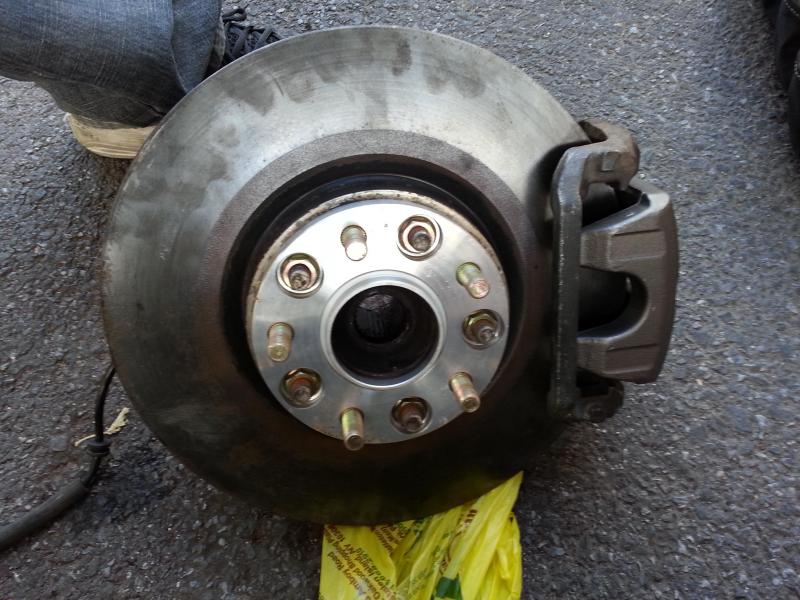
So I got spare spindles, drilled them out, replaced wheel bearings, and cut off the heat/splash shields to clear bigger rotor. I mounted the 6gen rotor and caliper to spindle with a wheel spacer to hold it in and test the fitment on 16s.

Name: 20140817_180135.jpg Views: 246 Size: 81.0 KB

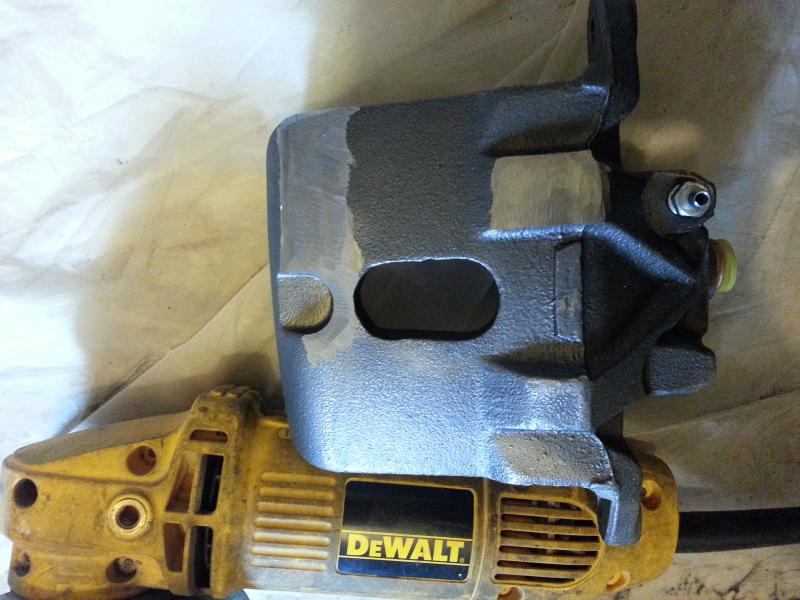
It didn’t fit so time to bring out the grinder! I grinded off the following parts of the caliper:

Name: 20140817_170411.jpg Views: 269 Size: 68.3 KB

And then grinded some more and some more…

Name: 20140818_025741.jpg Views: 237 Size: 60.9 KB

And then test fit it…

Name: 20140817_173137.jpg Views: 211 Size: 76.7 KB

And got it down to this…

Name: 20140817_174527.jpg Views: 242 Size: 81.0 KB

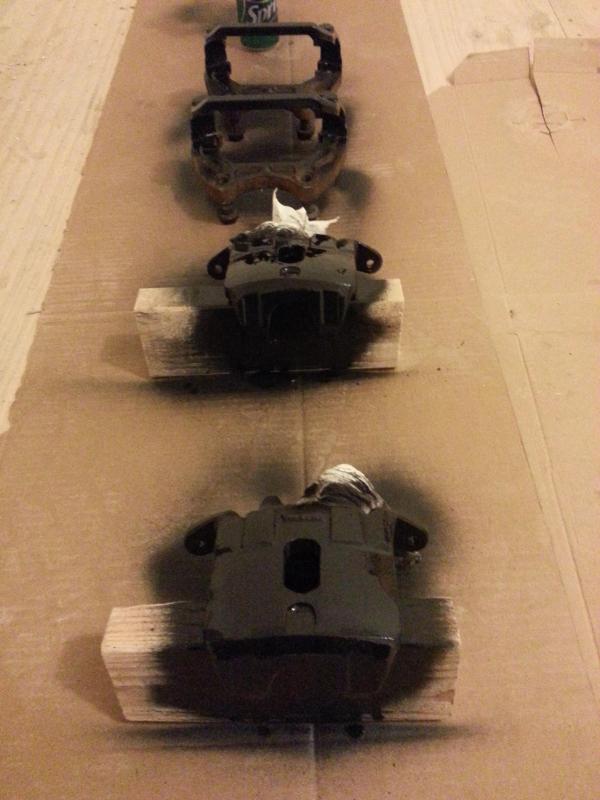
Once it cleared without issues I painted them

Name: 20140818_030202.jpg Views: 211 Size: 52.3 KB

Old SS brake lines were all nasty and weathered so: New Goodridge SS brake lines

Name: 20140820_132611.jpg Views: 238 Size: 98.9 KB

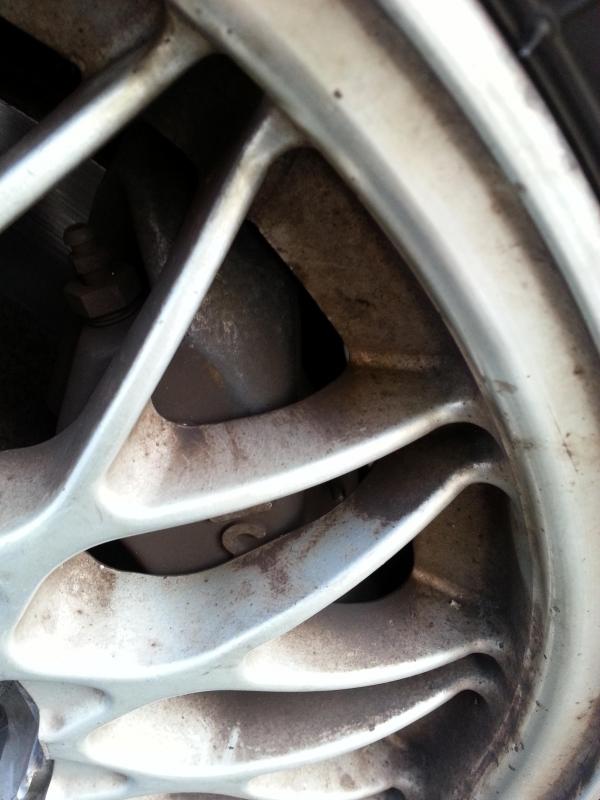
I did not need to use wheel spacers – they fit under the rims SO TIIIIIIIIIGHT!!! I love it!!!

Name: 20140825_130600.jpg Views: 232 Size: 59.2 KB

Braking is greatly improved. Had this setup since the end of summer and no rubbing, no issues just good brakes.

How do they compare to the wilwoods?
The wilwoods did have a better initial bite (4 piston clamp vs 1 piston) but when you step on the 6gens they just hold and hold like no tomorrow. Wilwoods would hold until a certain point and then start slipping (rotors gets hot)

For a typical drive around there’s no difference in braking 50-0, but when you push the car hard repeatedly, or braking from high speeds – they perform very well.

Loading

Community Member Credit: Carleton Wu

Having suspected a rear main seal leak for some time and oil covering tranny case (although bad diff. bearings also to blame) and high oil consumption. I dropped the tranny to do a tranny swap and found that the rear main seal was definitely leaking. There was no clutch slippage and the clutch disc did not have evidence of contamination–I think the flywheel shielded it some.

Flywheel removed (note oily residue all over):

Step one: Drain engine oil. Clean area (I used brake cleaner) and remove old seal–it is more of a bracket with integrated inner rubber seal. This includes any old stuck-on gasket sealant attached to the metal surfaces. It should look like this after:

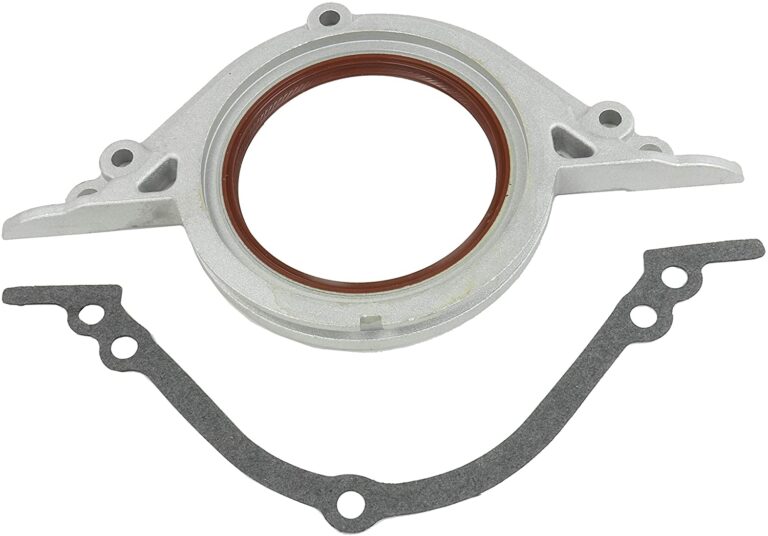
Step two: With new OEM rear main bearing seal in hand (THANKS, JRNISSAN!), coat the appropriate edges with permatex high-temp gasket sealant — the edges will have a channel to hold in the sealant. Coat the inner rubber seal with a light coat of motor oil.

Step three: Very carefully insert seal. Make sure you do not deform (ie. force it) the rubber inner seal or you will tear it (the damned seal ain’t cheap!) or the metal inner retaining spring will pop out. You want to gently nudge it over the crank so the seal sits flush. Make sure you allow sufficient time for the Permatex to cure.

The end result should look like this:

Loading

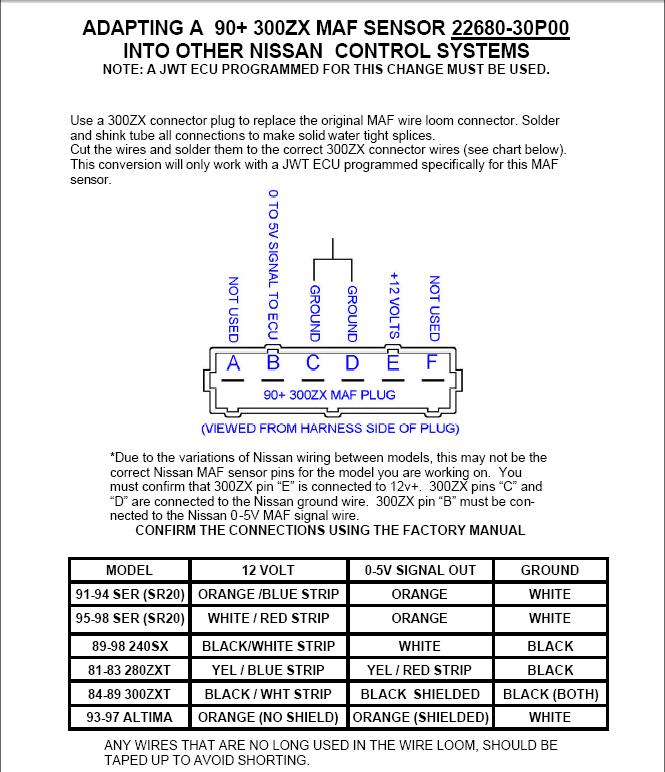
Z32 MAF Part Number: 22680-30P00
Tomei Z32 Airflow Meter Harness Part Number: 194002

The Z32 Mass Air Flow (MAF) sensor is great for turbo or supercharged setups. If you are not boosted then you do not need these. If you are boosted, the Z32 MAF allows you to measure more airflow into the engine than what the stock A32 MAF can. The Z32 MAF is calibrated for higher airflow and you can stay with an airflow referenced fuel metering system. The A32 MAF maxes out at an airflow equivalent to about 300HP and the Z32 MAF can meter about 500HP worth of air.

The J30 and the Z32 MAF both have the same sensor, just different harness connectors. The Z32 connector has two extra unused pins. Sometimes you can save money if the junkyard dealer doesn’t realize that the J30 MAF is the same as the Z32.

To simplify the installation, you can grab a Tomei Harness. The part number is 194002.

Z32 MAF Plug

A (No wire) = not used
B (White) = A32 White (Signal Wire)
C (Black) = A32 Black (Ground)
D (Orange) = A32 Black (Ground)
E (Black/White) = A32 Red (Power)
F (No Wire) = not used

1995-1999 5thgen Maxima MAF Pinout

Pin 1: White = MAF signal (White)
Pin 2: Ground (Black)
Pin 3: +12v ( Red)

Photo’s of Z32 MAF Sensor Installed

Loading