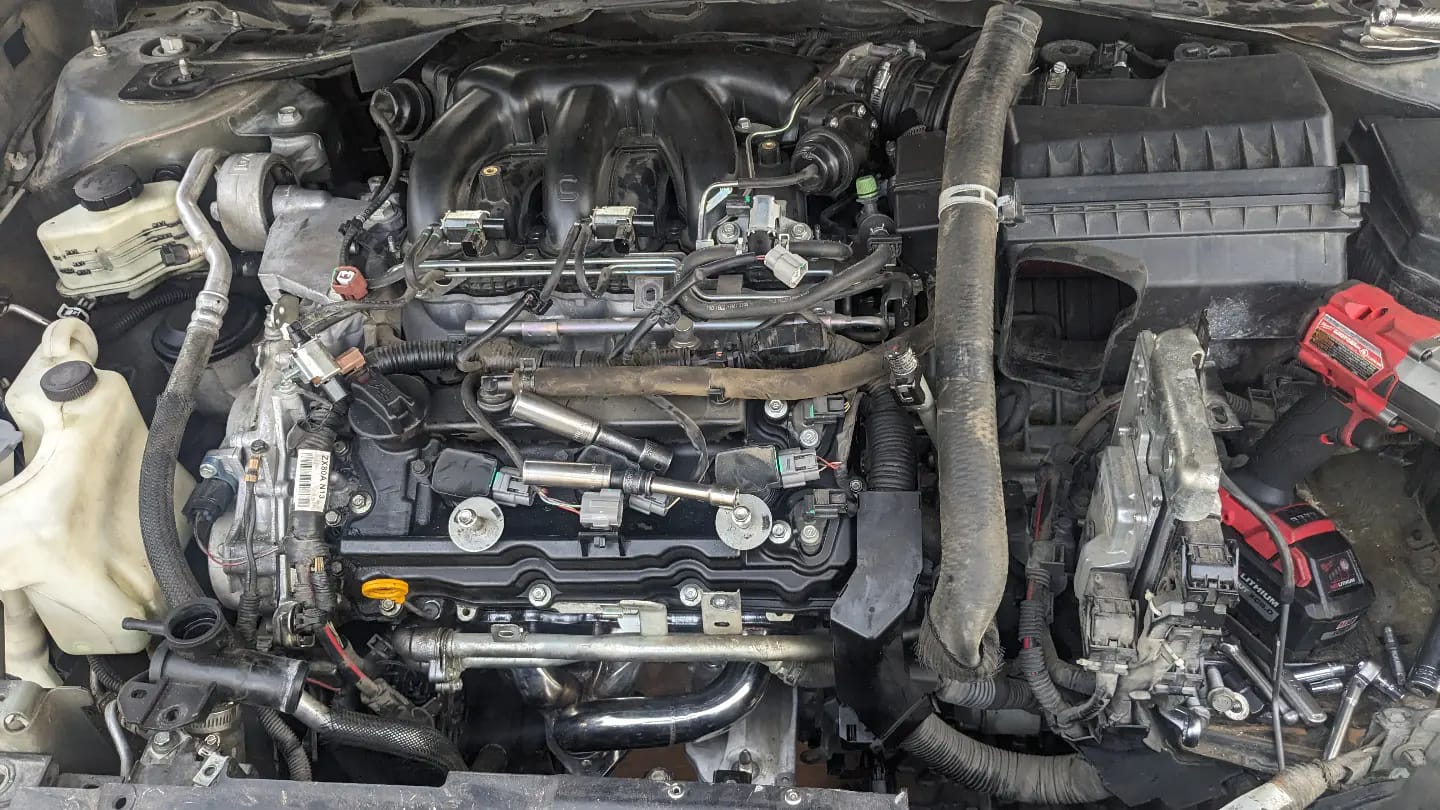
Before vs After
– Mitzone Aluminum Valve covers (Gaskets, PCV, Bolts, Oil Cap)
– 8th gen Upper IM
– TCM Delete
– Big 3 Wiring
– Engine Bay Plastic Panel Cover
Had to extend front o2 sensor harness. Most of the harness loom/tape was brittle and cracking when I would move it so I decided to do a mini wire tuck and also tucked the vacuum lines/solenoids for vias deleting the vacuum rail for a much cleaner look IMO.
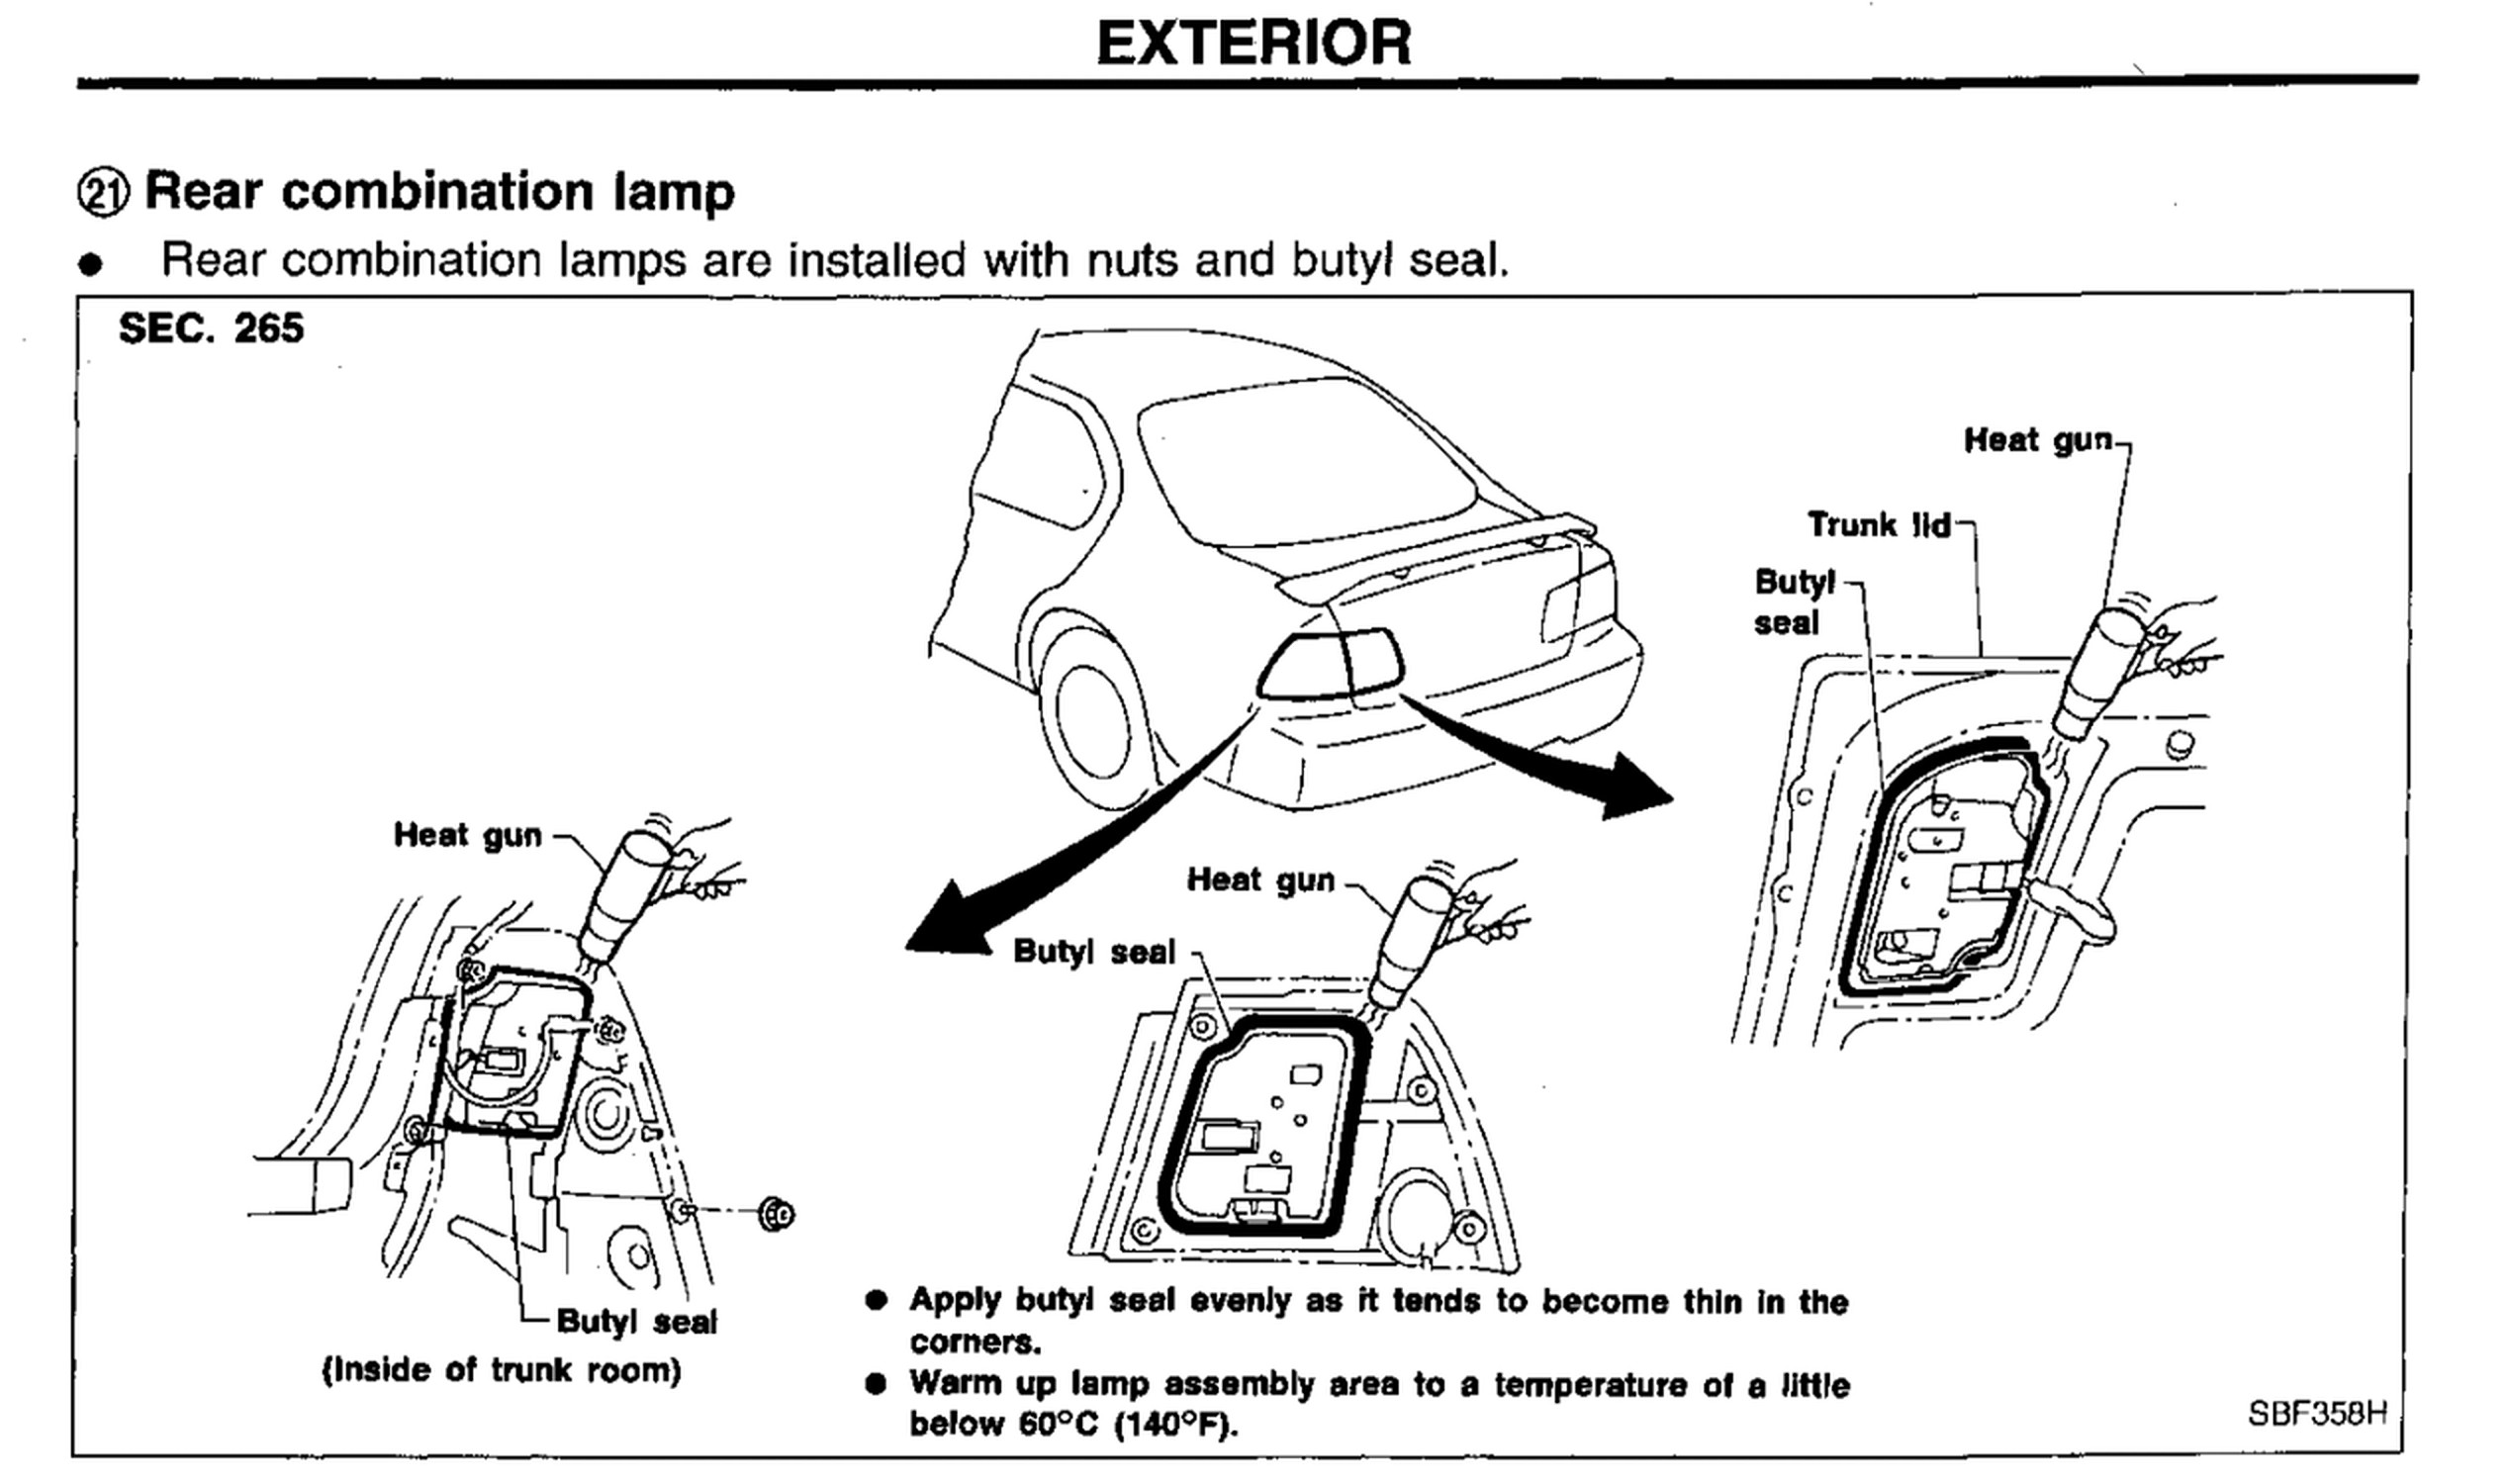
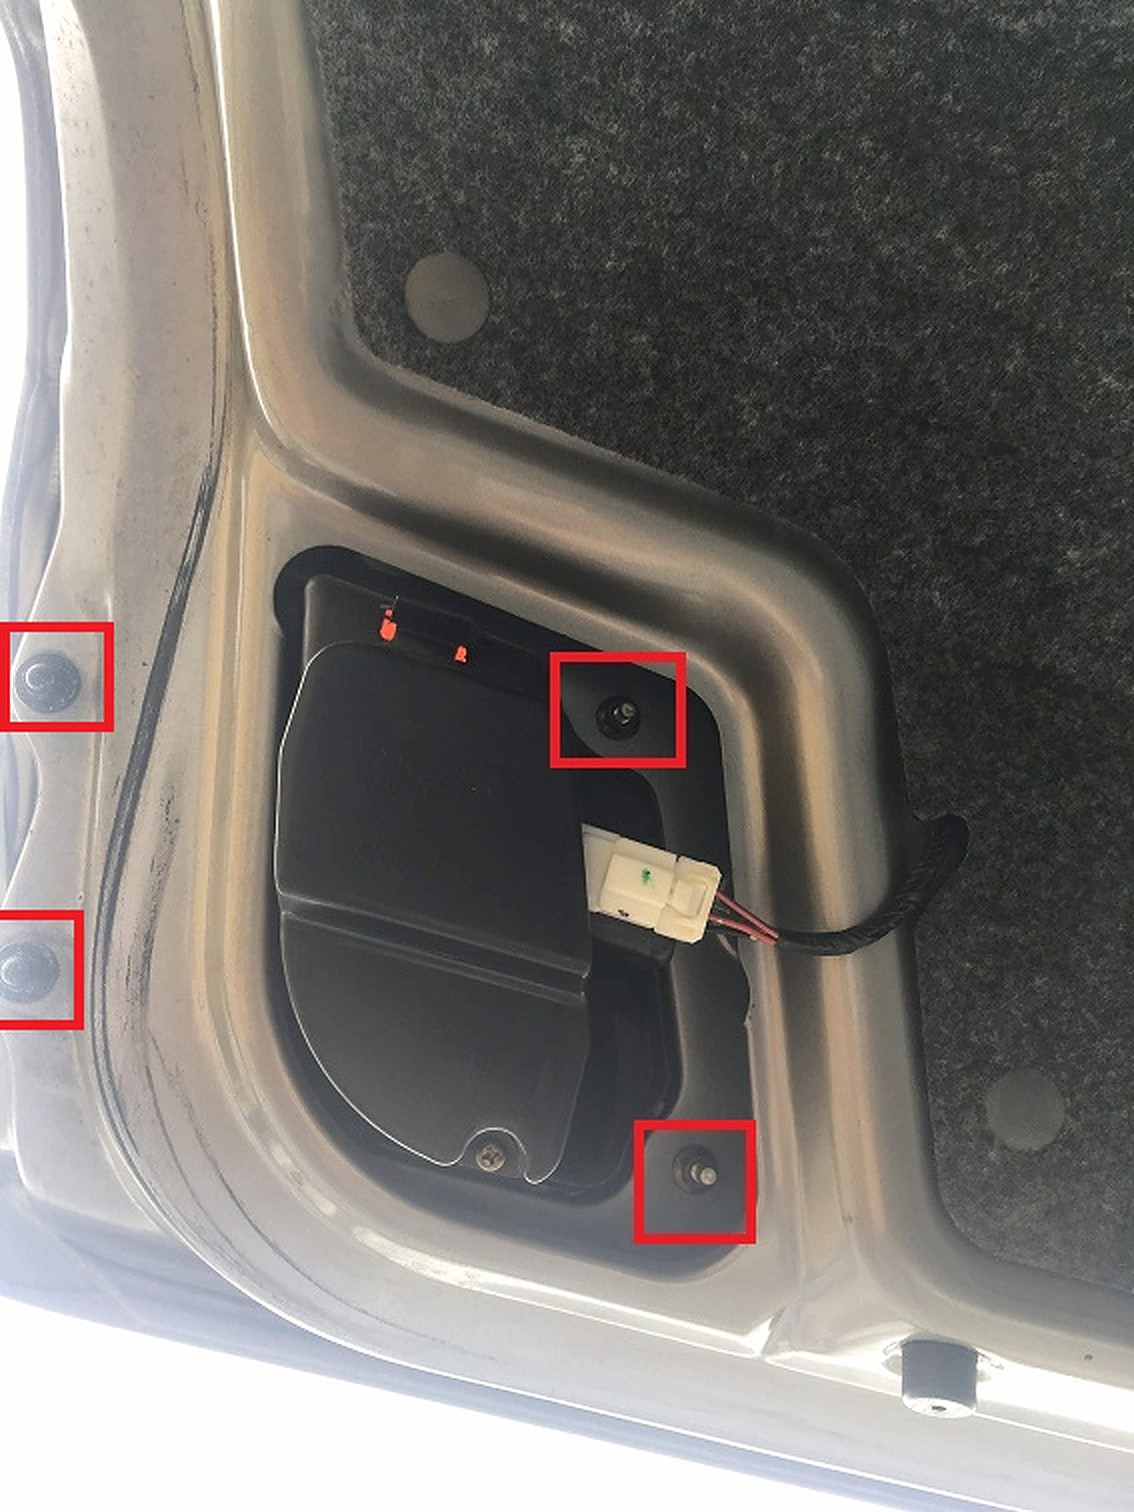
In my 1999 SE car, there was a water leak issue in the trunk, specifically near the passenger side keyless entry box. I noticed the leak when I opened the trunk after driving in the rain. It seemed to be coming from the area where the passenger side trunk hinge meets the trunk or the weatherstripping near the top right of the trunk. Upon investigation, I found that the problem was a faulty gasket in the passenger side tail light.
I managed to remove the tail light housing easily and re-sealed it using a heat gun and following the instructions in the FSM (Factory Service Manual). Dealing with the butyl sealant was a bit challenging, but I removed the old material and applied the new one carefully, making sure to seal the base of the studs as well. After reattaching the housing to the trunk and tightening the bolts, I didn’t notice any leaks during a rainy drive, but the issue had been intermittent in the past. I’ve gone through two rainstorms without major leaks now.
Both my AC and heat stopped blowing air at the time same. Since I had NO AIR blowing at all, I suspected it was the blower motor itself. Usually, when it’s the resistor, you can get air blowing on speed setting #4.
I ordered an OEM-used blower motor off eBay for $30 bucks vs aftermarket. Upon inspecting the blower resistor itself, it was very corroded and dirty. So I decided to order a new blower resistor as well. Also, you need to ensure you get the correct resistor as there are differences between Digital Climate and Manual Climate controls.
I replaced both and everything started working again. I really only needed to replace the blower motor. But since I saw the condition of the resistor, I decided to change that as well. Now have cold air and hot air. Also, while you’re at it change the CABIN FILTER too.
Important Note: You should check the 2 blower motor fuses under the engine bay to ensure they are not blown.
2000-2003 Manual Climate Control Blower Resistor
Part #: 27150-2Y910
Nissan OEM Price: Approx. $30.00 (RECOMMENDED OPTION or USED OEM WORKING PART)
After Market Price: Approx. $35.00
Manual Climate Control Reference Photo
2000-2003 Digital Climate Control / Navigation Blower Resistor
Part #: 27761-2Y000
Nissan OEM Price: Approx. $80.00 (RECOMMENDED OPTION or USED OEM WORKING PART)
After Market Price: Approx. $15.00
Digital Climate Control Reference Photo
Digital Climate Navigation System Control Reference Photo
Difference Between OLD Blower Resistor vs eBay (Old on Right)
New Blower Resistor
2000-2003 Blower Motor Fan Assembly Unit (Same for Manual / Digital / Navigation)
This is what turned out to be my issue.
Part #: 27220-2Y910
Nissan OEM Price: Approx. $145.00 (RECOMMENDED OPTION or USED OEM WORKING PART)
Just replaced my axles and seals and if anyone’s looking the correct seal, these pictured are the right ones. Fits and no issues on the 7gm Just incase someone needs to do axles and seals and is struggling to find the seal. These are it. Site only goes up to 2012 and says they don’t fit 2014 but they do. New axles feel good (import direct brand, ***reference only) ***reference only, not selling.
Changed charcoal canister/vent control valve and blew out the EVAP line from the engine bay (circled). Bolts were snapped from previous owner and self tappers were used. Took out bracket and welded new nuts on and got all new hardware and painted with rust encapsulate.
Replaced fuel filler neck with superseded part number, only difference is the gas cap band hole is not there. Also threw on the filler neck cover that is discontinued and only found in 2000-2001 cars apparently. You also you need 4 plastic clips with it.
ORDER YOUR FILTER (MAKE SURE YOU GET THE ACTIVATED CARBON FILTER)
Part Number: FC35530
TOOLS:
PHILLIPS SCREWDRIVER
SAFETY
EVEN IF THIS PROCEDURE DOES NOT REQUIRE RAISING OF THE VEHICLE, WE CANNOT STRESS ENOUGH…NEVER GET UNDER A RAISED VEHICLE WITHOUT THE USE OF QUALITY JACK-STANDS
1. REMOVE THE DOOR SILL BY PULLING UP AND UN-POPPING THE CLIPS.
2. UNSCREW THIS PLASTIC NUT AND REMOVE THE SIDE PLASTIC PANEL. THE PLASTIC NUT SHOULD COME OFF BY HAND, IF NOT USE A WRENCH.
3. LOOK UNDER THE GLOVE-BOX AND REMOVE THIS PLASTIC PANEL, PULL DOWN ON THE FRONT AND IT WILL UNCLIP.
4. USING YOUR PHILLIPS SCREWDRIVER UNSCREW THESE 2 PHILLIPS SCREWS UNDER THE GLOVE BOX.
5. OPEN YOUR GLOVEBOX AND UNSCREW THESE 4 SCREWS.
6. YOUR GLOVEBOX SHOULD NOW COME OFF (DISCONNECT ANY WIRES NECESSARY – DO NOT DISCONNECT THE YELLOW AIR BAG PLUG/WIRE).
7. TO REMOVE THE FILTER YOU WILL PUSH ON THIS TAB TO RELEASE THE FILTER COVER.
8. PULL OUT THE OLD FILTER.
9. INSTALL YOUR FILTER **(NOTE THE DIRECTION OF AIR FLOW ON THE NEW FILTER – THE AIR FLOWS DOWNARDS IN OUR CARS, SO MAKE SURE YOU INSTALL YOUR FILTER PROPERLY).
NOTE: WHEN PUTTING THE FILTER COVER (DOOR) BACK ON YOU WILL NEED TO LIFT THE FILTER UP WHILE CLOSING THE COVER, THE DOOR HAS TABS ON IT AND THE FILTER NEEDS TO SIT ABOVE THESE TABS.


 FIX INSIDE")


")


")


