Community Member Credit: Mauricio G.
- 11298-40U01 – FRONT BOLTS
- 1298-40U06 – REAR BOLTS

![]()


")
Community Member Credit: twiggy144 / khemraj1999
The rear O2 sensor (downstream of the cat) failed. I had both codes 0512 and then 0912. This lights up the SES warning lamp, but the ECM does not use any other signal from the rear O2 sensor as input to manage the fuel and ignition system in a closed-loop operation. The only purpose of the rear O2 sensor is to monitor the function of the catalyst. So I didn’t care much about having a functioning rear O2 sensor. I wanted a creative solution to turn off the SES lamp. A search on eBay resulted in an “O2 sensor simulator”.
I ordered one unit and installed it. My installation also included 2 additional 25 ohms resistors rated for 15 Watt load to simulate the O2 heater function. The ECM also monitors the heater function of the O2 sensor. So I had to take care of that error code as well to have the ECM turn off the SES lamp. I tapped in the 2 resistors in series in place of the heater wires. As an alternate to resistors, I think a simple 12V 3Watt automotive bulb ( No 194) could have simulated the heater function of the O2 sensor.
The whole installation went smooth, and the ECM switched off the SES lamp. I recommend very much the DualO2Sim. It costs much less than a genuine rear O2 sensor. Please remember this simulator works only for the rear (post catalyst) O2 sensor.
The simulator is offered at $30. A genuine O2 sensor costs at least $60. I can make a write-up. I will post it later.
Wanted to share my experience with all.
The rear O2 sensor has 4 wires (on my 1998 Maxima).
Cut all 4 wires of the O2 sensor. Cut the wires close to the bad O2 sensor. That will give you some good wire length after the connector located under the driver’s seat. (On my 1998 Maxima the connector is located under the driver’s seat. This is where the O2 sensor wires emerge from under the car through a rubber grommet). Leave the bad O2 sensor in the exhaust pipe.
The sensor simulator also has 4 wires:
Use a voltmeter to identify which of the white wires above (3- or 4- ) is the +12V feed. The voltmeter will show a +12V signal with wire 3-. Connect this wire with wire a-.
Connect wire 1- with wire c- or d-. (My car only had one O2 sensor ). Leave the other purple wire unconnected if you have only one rear O2 sensor.
That will take care of ECM code 0512 Downstream oxygen sensor high voltage fault.
In my case, I also had to simulate a functioning O2 sensor heater. I used 2 x 25 ohms resistors (rated for 20 watts each) and connected in series them between wires 3 and 4. Polarity is not important for these. Under 12 V these should dissipate 1.5 Watt each, with 0.24 amps running through them. Be careful where you locate these because they get hot. Not burning hot, but hot. I tied these down under the driver’s seat. I estimated this area had enough open air to dissipate the heat. That took care of ECM code 0902 (Downstream oxygen sensor heater or circuit fault).
I have not tried but I think a simple 3Watt automotive bulb (No. 194 for example) connected between wires 3 and 4 will do the job of fooling the error code 0902.
I found the O2 sensor simulator on ebay.com Look for “O2 sensor simulator”. The supplier, Baker electronics, includes detailed electrical schematics for installation. This simulator will not detect a malfunctioning catalyst. Therefore check with your local regulations for compliance with such an installation on your car.
Thought I’d revive an old thread with some pics to help others with an o2 sim install on my 1997 Maxima. I followed twiggy144’s wire codes and o2simulator.com’s installations codes.
I used a sharp knife to slice through the plastic on the wires (DONT CUT). The o2 sensor wires are hard to work with, so I sliced the harness wire. I also left the o2 sensor in to simulate the heater signal but I cut the Sensor’s signal wire (black).
So following twiggy’s instructions:
If u need to get rid of the sim..just pull wires out and tape up the slice. (no cuts involved..except the cut from the o2 sensor signal wire..my sensor was failing so I didn’t care.


![]()


")
")
Write-up: Changing Manual Transmission Fluid


I changed my tranny fluid, it was VERY easy. In fact, easier than changing the motor oil (stupid socket won’t fit over the bolt on the oil pan because the ATTS unit is blocking it).
Anyway here goes.
Tools required:

-3 quarts manual transmission fluid (get 3 in case you need more)
-3/8″ drive socket wrench
-17mm socket
-Small attachment pump for the fluid bottles
-Drain plug washer (94109-14000)
-Filler plug washer (94109-20000)
-Something to catch the oil
-Torque wrench (optional but recommended)
-Jack/jack stands
The tranny is located near the front passenger wheel. Here is the pump I used, it was 2.99 from kragen:

Step 1:
Jack up the car. Make sure the car is completely level when raised (4 jack stands recommended). The reason for this is to know how much you fluid you have filled up).
Step 2:
Remove the filler plug.
Use a 17mm socket.
A little bit of fluid should start dripping out.

Step 3:
Remove the drain plug.
As you can see from the picture, the bolt is a little square shaped, a 3/8″ socket wrench will fit right in. Remove it. Be careful, the oil will squirt out pretty far (same with motor oil).
Step 4:
Replace the washers on both bolts.

Step 5: Let the trans drain.

Step 6: Put the DRAIN bolt back on, torque it to 39 N-m (29ft-lb).
Step 7: Attach the pump.

Step 8: Route the tube to the filler hole, pump away!

Step 9:
Continue to pump until filler hole has fluid running out. Stop pumping. Let the remaining fluid drip out.
Manual states:
2.2 US qt at oil change, 2.3 US qt at overhaul for type-SH models
2.0 US qt at oil change, 2.1 US qt at overhaul for base models
Step 9:
Put the FILLER plug back on. Tighten it to 44 N-m (33 lb-ft).
**FYI, you can also fill the transmission through the breather hole on top of the transmission, underneath the air box.
That’s all!
— This write up courtesy of Ludatic —
![]()

")
Community Member Credit: mydecember1985
Our ’02 bone-stock I35 w/113k on the clock had a weird burnt smell yesterday. I got it to the side of the road to look things over, but the smell wasn’t super strong. I googled it and was unaware the motor mounts were an issue with the VQ35s as well. I immediately disconnected them and drove it home. This car has no IACV, so I didn’t bother looping it out of the system today.
I just pulled the ECU and got these pictures. This ECU has “FQ” on top. The part number looks to be A56-T69 ZP8. NOTE: The bottom seems completely fine except for a minor spot around the 5th pin in that chip. No tracers on the bottom are burnt/black. Just that one on top that runs under those green chips.
The car seems to run perfectly fine except for some slight hesitation/surging that I think is more related to 1 non-OEM coil I had to swap in a few months ago and then forgot to track down a matching set of 6. (Wife’s car and is barely driven)
Does anyone know what system this chip is responsible for? Is it OK to continue driving if this thing just controls the motor mounts?
The weird thing is that there are NO CODES?!?!


So the ECU made it to Foreign ECU repair yesterday. They repaired it and are sending it back soon. They recommend I replace the IACV, but our car doesn’t have an IACV. See picture. It’s all one big piece of the throttle body. Is this part known to cause ECU failures? The motor mounts are still unplugged. Anything else I should replace?

Replaced Throttle body to be safe. Motor mounts are left unplugged. Went to start car to get it warm and complete relearn. Car ran like absolute hot garbage! I was freaking out. The exhaust was smoking a bit (never has before) and stunk of unburnt fuel. I couldn’t even get it to maintain an idle long enough to warm it up and do the relearn. If I did keep revving it to warm it up, I was worried the insane amount of fuel dumping into the system was going to ruin the car’s already-fragile cats.
Since MAF has a lot to do with A/F ratio, I went to grab a Duralast replacement. The closest Denso/Hitachi was 4 hours round trip. $110 and it fixed the rich condition. I was able to warm the engine and relearn idle. Total cost: $250 ECU fix, $130 throttle body, $110 MAF. $490 total I’m really wondering if the MAF was the whole problem with the hesitation and the ECU was completely unaffected because it drove fine for a while the ECU burned up back in February-ish and I unplugged the mounts. I also have a spare throttle body now since it was doubtful that caused the failure.
![]()

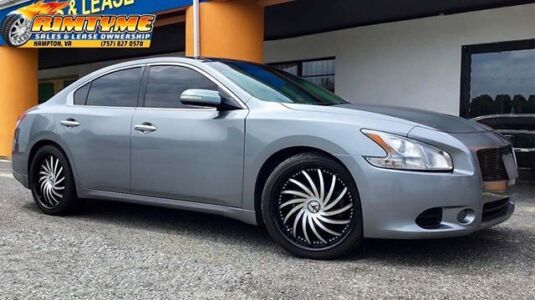
Owner: Eddy A.
Year: 2009
Model: Maxima
Color: Silver
Engine: Gen2 VQ35DE
Transmission: CVT
Trim: SV


![]()