

Credit: doc2278
Turbocharging the VQ30: My Experience with the Turbo Specialties Kit on a 2000 Nissan Maxima
As many of you already know, I recently installed the Turbo Specialties VQ30 Turbo Kit on my 2000 Nissan Maxima. Since quality turbo kits for the Max are few and far between, I wanted to share my honest experience — from unboxing to tuning — for anyone considering taking the plunge.
First Impressions: A Surprisingly Complete Kit
Right out of the box, I was impressed. This is easily one of the most comprehensive kits I’ve seen for the Maxima platform. It includes:
-
A standalone control unit that combines multiple functions — turbo timer, boost controller, boost data logger, and injector driver.
-
A set of injectors included in the kit, meaning no need to source your own or risk running lean.
-
New motor mount, engine bracket, bolts, turbo manifold, and downpipe — all included.
The control unit deserves special praise. It’s well thought out, easy to wire, and performs exactly as advertised — turbo timer and all. Having everything integrated in one module saves a ton of time and money versus piecing together electronics separately.
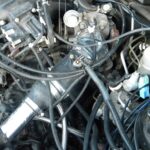
Installation Notes: The Good, the Tricky, and the Workarounds
Oil Return Line
The only part I outsourced was dropping the oil pan for the return fitting — that cost me about $450.
The kit’s return line is a fiber-wrapped 5/8″ rubber hose, but I recommend upgrading to steel braided 5/8″ line for durability. Pick one up from Pep Boys for around $30, along with a 5/8″ L-fitting and collars to protect it from road debris.
Heat Shield
The included heat shield requires trimming to fit. A rotary grinder or Dremel makes this job much easier. Mark your cut lines first, trim carefully, and smooth the edges — sharp metal near a turbo is never a good idea.
Turbo Fitment
The top oil inlet tube needed a slight bend to clear the cooling fan. I used a $6 aluminum tube bender from AutoZone and a Dremel to shave the fitting edge — just enough to clear, not weaken it.
I also had to rotate the compressor housing (“snail shell”) to align it properly with the intake. After several radiator test fits, I locked everything down tight. Be careful with the oil return fitting; if it’s not seated correctly, you’ll have oil everywhere — ask me how I know.
Manifold and Wastegate
Mounting the manifold is a two-person job. Follow the FSM torque pattern, and finger-tighten the bottom center nut first before working outward.
The wastegate bracket needs minor trimming to allow the O₂ sensor to thread in properly — mark carefully, trim sparingly, and test-fit multiple times.
Charge Piping and Intercooler
Once you reach this stage, you’re almost done.
You’ll need to cut holes in the plastic underpan to route the charge pipes. On my setup, the driver’s side pipe (#7) hung too low, so I shortened it about 1.5 inches to sit flush with the fascia.
I mounted the intercooler brackets to the lower frame using self-tapping screws. Tip: mock up all the piping before bolting in the intercooler to ensure perfect alignment.
Wiring
Follow the provided diagrams carefully. The wiring is straightforward, with the only tricky part being the tachometer wire tap at the ECU. If you don’t have a factory service manual (FSM), you can find it at PhatG20.com — trust me, it’s a lifesaver.
Startup, Tweaks, and Break-In
Once everything was buttoned up, I double-checked every connection, started the car, and checked for leaks around the manifold and fuel lines. A few bolts needed retightening, but otherwise, the system came alive beautifully.
I drove gently for a week to let the ECU adapt, and sure enough, it adjusted timing automatically. The blow-off valve sounds fantastic — smooth and sequential in tone — and the turbo spool is addictive. It completely transforms the character of the car.
Dyno Results and Performance
Under test conditions:
-
Humidity: 94%
-
Dew Point: 60°F
-
Barometric Pressure: 30.5 inHg
-
Temperature: 62°F
-
Time: 1:15 PM
At 7–8 psi, the results speak for themselves:
| Metric | Stock | Turbo Kit |
|---|---|---|
| Wheel Torque (wtq) | ~173 | 244.3 @ 4650 rpm |
| Wheel Horsepower (whp) | ~186 | 220.3 @ 5100 rpm |
That’s a solid gain for a bolt-on kit running modest boost through an automatic transmission with a T28 ball-bearing turbo. If you want to push it further, you can easily upgrade to a larger turbo down the line.
Final Thoughts
At $2,888 shipped from California to New Jersey (arrived in 5 days), this kit is an outstanding value. The instructions are thorough, the hardware fits well, and the performance is night-and-day compared to stock.
If I had to do it all over again, I wouldn’t change a thing. The install was challenging in spots but deeply rewarding — and the end result feels OEM+ in both reliability and response.
If you’re considering this setup and need help during your install, feel free to reach out. I’ll be happy to walk you through any tricky steps.
The Turbo Specialties VQ30 Turbo Kit truly brings new life to the Maxima platform — and in my opinion, it’s worth every penny.


![]()

Comments are closed.