Category

allGens

Category

Member Credit: schmellyfart

I was reading one of Nissan’s technical documents on the HR engine and its improvements HERE when I came across this:

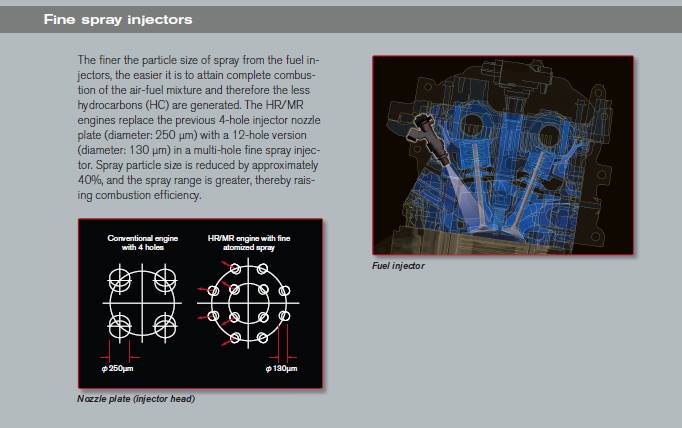
Which then had me wondering if these improved injectors flowed less fuel in FWD applications compared to RWD applications as they did with the First generation VQ35DE. In addition to the flow rate, I was also interested in seeing how the injector spray patterns compared with the different hole configurations.

I had an ASNU Classic Injector Flow Bench at my disposal at school, so I finally took advantage of it, and cleaned & flow tested a handful of injectors to say the least.

Injectors tested:

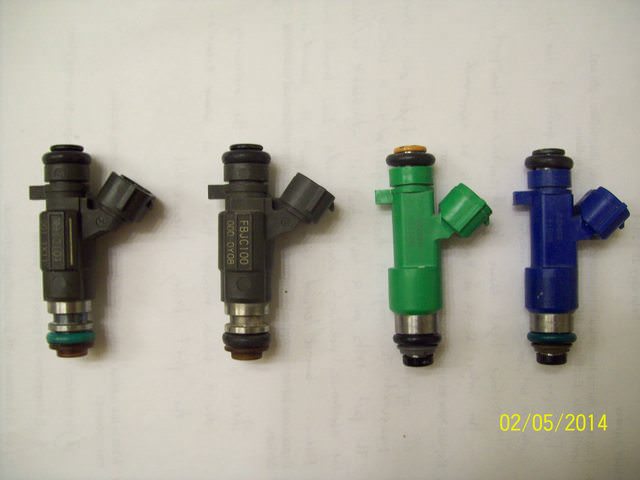
  • 21 FBJC100 [VQ30DE-K] 5th Gen Maxima
  • 7 FBJC101 [1st Gen FWD VQ35DE] 5.5 Gen Maxima
  • 12 Green Denso [2nd Gen FWD VQ35DE] 7th Gen Maxima
  • 6 Green Denso [VQ35HR] 350z
  • 6 Blue Denso [VR38DETT] GT-R

Test Procedure:

  1. Each Injector was run on a 10 minute automatic cleaning cycle before testing
  2. A test run was then done to set fuel pressure at 3 bar while the injector is spraying
  3. Each injector was tested three times and its results averaged
  4. Each injector test was run for 20 seconds with the exception of the Blue Densos, which were run for 10 seconds

I wasn’t able to take clear pictures of the holes in the injector nozzle plate. So this description will have to do.

FBJC100 – 4 hole
FBJC101 – 18 hole
Green Denso – 12 hole
Blue Denso – 12 hole

Results


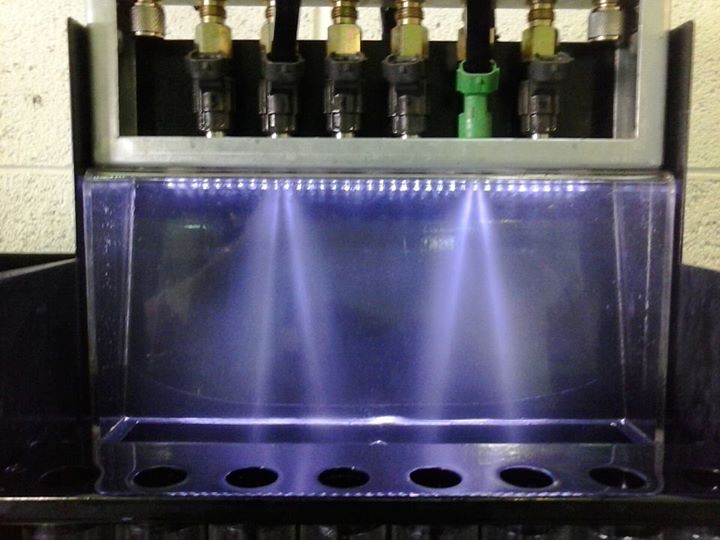
FBJC100 left, Green Denso right


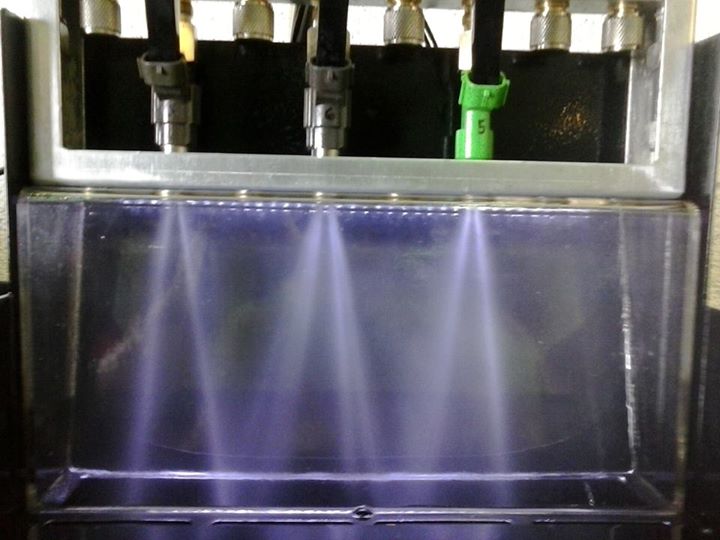
FBJC100 left, FBJC100 middle, Green Denso right
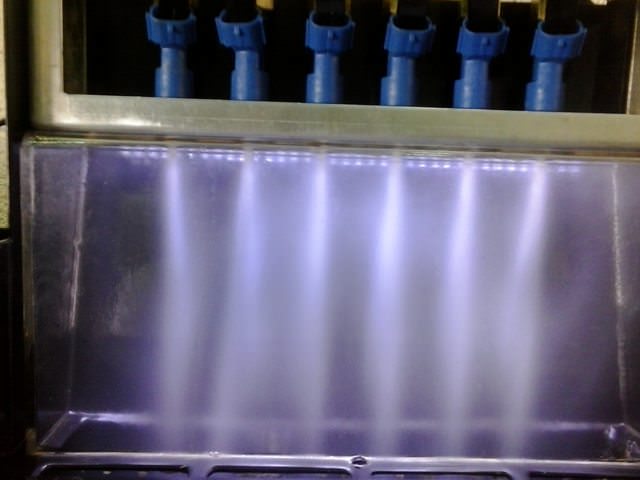
Blue Denso

I also recorded videos of pulse testing as well.


Static Flow Test Results at 3 bar:

FBJC100 – 306 cc/min
FBJC101 – 294.25 cc/min
Green Denso – 309.25 cc/min
Blue Denso – 546 cc/min

To sum it up, the Green Densos in the newer VQ35HR and HR styled 09+ VQ35DE have the same flow rate. At that, they only flow a tiny bit more fuel than the FBJC100, but have better atomization. The Green Denso injectors are also lighter in weight than the FBJC100 at 0.070lb each for the Green Denso, and 0.098lb each for the FBJC100.

Loading

Credit: Noah Vella

I had trouble finding a decent OEM type option so I hope this helps a few people out. I was originally going to wrap the chrome black but it actually matches the e-brake button, Nissan emblem and door handles so I think I’ll keep it chrome.

Shift knob:

You can find these on online (eBay) between $15.00 to $20.00 shipped from China. The common search words are 6 Speed Gear Shift Knob For Nissan X-Trail T30 2001 2002 2003 2004 2005 2006 07″.

You will need this adapter:

  • Price: $7.99
  • Description: Kei Project Metric Thread Stainless Steel Shift Knob Shifter Manual Stick Adapter Insert Kit 12×1.25 to 10×1.25 Lock Nut Included
  • Link: https://www.amazon.com/dp/B01H2SPAWU

Before:

Parts:

After:

Loading

Gallery of our community members rocking their my4dsc.com decal/sticker swag!


Loading

Credit: Lagging Tryhard 

Parts List:

  • Transmission (07+) $600 – LKQ
  • Shift Cable Assembly (34413-JA20A) $150 – Z1Motorsports
  • Shift Cable Brackets (34448-JA60A/JA61A or 34448-ZX20A/ZX21A) $50
  • Shift Plate Lock (36406-9B000)*2 $10 – Z1Motorsports
  • Flywheel (Luk is $237 JWT is $415) – RockAuto/Nisformance
  • Clutch w/ Pressure Plate (JWT $417) – Z1Motorsports
  •  Axle Seals (38342-8H500/8H501) – nissanpartsdeal.com
  • Axles (39100-JA10F Passenger 39101-JA11F Driver)
  • Flywheel Bolts (12315-ZA000) $1.89 * 8 – Z1Motorsports
  • Pressure Plate Bolts (30223-JA00A)
  • Transmission Mount (Anchor 9733) $40 – RockAuto
  • Transmission Mount Nut and Bolts (01223-N2011 & 11298-JA00B * 4)
  • Starter (23300-JA10D) $323.49 or can buy from parts store
  • Starter Bolts (11916-8J11A * 2)
  • Shifter Assembly (34101-ZN00A) $175
  • Clutch Master Cylinder Reservoir (30610-JK00A)
  • Clutch Master & Slave Cylinder Kit – $950 – Contact Gerson Flores
  • Tune – $960 – Contact Gerson Flores
  • Handbrake (08 Maxima) $100 or Electric E-Brake (ESK 001) $475
  • Threaded Rod (M12x1.75) Grainger
  • Clutch Pedal (Mine is from ’03 Infiniti G35 but most people use 07+ Altima Clutch Pedal)
  • Gear Oil ( Redline MT 85 or MT 90)

Loading

Loading

This describes removing and installing the rear O2 sensor behind the catalytic converter for 95-99 (Federal Emissions) Maxima/I30s.

Items Needed:

  • PB Blaster (or another rust penetrant)
  • 22mm Wrench
  • Flat Head Screwdriver
  • Electrical Tape
  • Jack and Stands
  • Work Light

First, you will need to remove the bad O2 sensor. Use generous amounts (frequently) of the rust penetrant on the sensor where it goes into the exhaust pipe (bung).

While allowing the penetrant to work, follow the wire from the back of the sensor to where it goes into the floor panel. Use a screwdriver to pry the large rubber grommet from the floor pan. Once the grommet is loose, disconnect the plug that attaches the sensor to the harness.

Now use the 22mm wrench to remove the bad sensor from the bung. Continue using the penetrant as needed. This is the hardest part of the process (especially if you live in a snow state).

This is what you should be looking at once the bad sensor is removed.

Screw the new sensor into the bung and measure where the grommet will be positioned. Mark this position with a piece of electrical tape, and remove the new sensor from the bung.

Wrap the electrical tape around the wire cover on both sides of where it passes through the grommet. I added tape where the wire come out of the rear of the sensor.

Apply the anti-seize that comes with the new sensor to the threads; use plenty and coat all the threads, you’ll be glad if you have to do this again. Screw the new sensor into the bung and tighten with the wrench.

Attach the sensor clip to the harness.

Push the grommet back into the floor panel until you feel/hear the plastic backing catch, and the grommet is secured.

Loading